Old window tint might seem like a minor eyesore until you realise how much damage it can hide beneath the surface. Did you know that improper tint removal can lead to repairs costing hundreds of pounds and may even damage the glass permanently? Most people worry about the sticky adhesive, but the real trouble often comes from tiny scratches and hidden flaws that only show up once the job is done.
Table of Contents
- Understanding The Challenges Of Old Window Tint
- Step-By-Step Process For Safe Tint Removal
- Essential Tools And Products For Professionals
- Preventing Damage And Ensuring A Clean Finish
Quick Summary
| Takeaway | Explanation |
|---|---|
| Assess Tint Deterioration First | Before removal, evaluate for bubbling, peeling, or discolouration to anticipate challenges and minimise damage. |
| Use Professional Tools for Removal | Employ heat guns, precision scrapers, and specialised solvents to safely remove tint without harming the glass. |
| Control Heat Application | Maintain consistent heat distribution to soften the adhesive and ease film extraction, preventing glass damage. |
| Thoroughly Remove Adhesive Residue | Use professional-grade adhesive removers to eliminate all sticky remnants, avoiding complications for future tint applications. |
| Prioritise Surface Protection | Implement protective techniques and careful handling to preserve glass integrity during and after the removal process. |
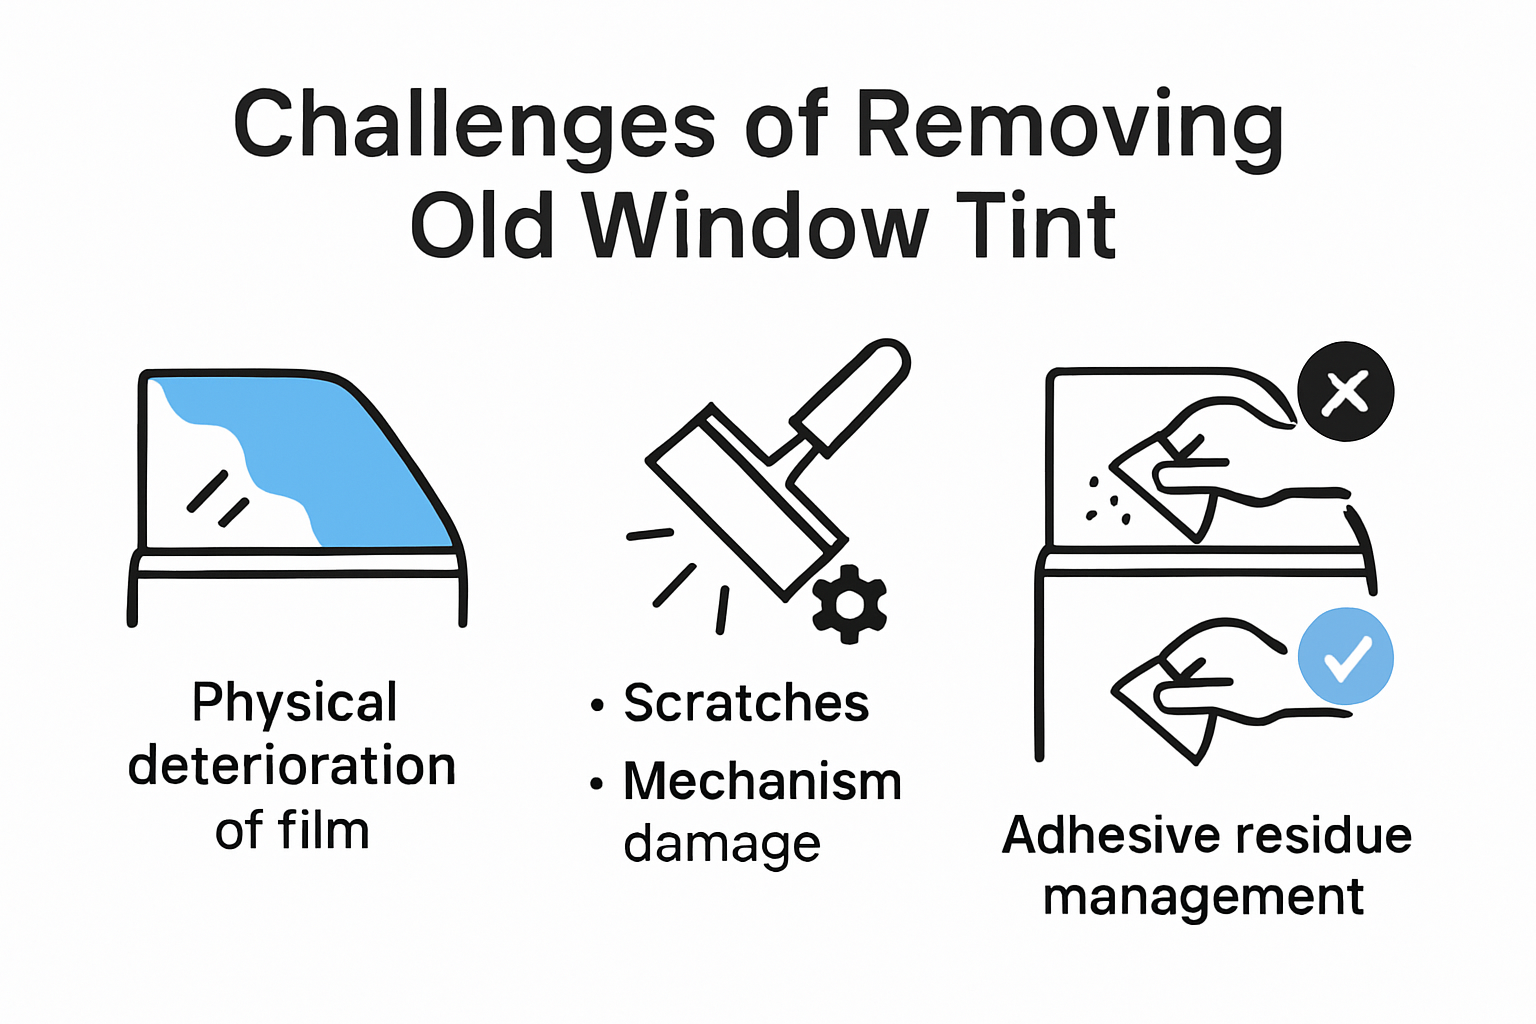
Understanding the Challenges of Old Window Tint
Removing old window tint represents a complex technical challenge that demands precision, specialised knowledge, and strategic approach. Professional vehicle wrap and window tint installers frequently encounter multiple obstacles when attempting to remove aged window films, which can compromise both aesthetic and functional vehicle components.
The Physical Deterioration of Window Tint
Window tint naturally degrades over time due to continuous exposure to ultraviolet radiation, temperature fluctuations, and environmental stressors. Learn more about window tint composition reveals that polymer-based films experience molecular breakdown, causing significant adhesive degradation and material embrittlement. This deterioration manifests through visual indicators such as bubbling, peeling, discolouration, and reduced film integrity.
As window tint ages, its structural composition changes dramatically. The adhesive layer begins to break down, creating stubborn residue that becomes increasingly difficult to remove. According to research from automotive preservation experts, improper removal techniques can lead to substantial glass surface damage, potentially costing hundreds in repairs.
Risks of Improper Removal Techniques
Attempting to remove old window tint without professional expertise introduces significant risks. Sharp tools like razor blades or utility knives might seem convenient, but they can catastrophically damage automotive glass surfaces. These instruments can inadvertently scratch glass, compromise electrical window mechanisms, and create microscopic abrasions that weaken the window’s structural integrity.
Professional installers understand that effective tint removal requires specialised heat guns, precision scrapers, and chemical solvents designed specifically for automotive applications. The process demands nuanced technique: applying controlled heat to soften adhesive, carefully lifting film layers, and systematically removing residual adhesive without causing surface damage.
Adhesive Residue Management
One of the most challenging aspects of window tint removal involves managing persistent adhesive remnants. Standard household cleaning products prove ineffective against automotive film adhesives. Professionals utilise advanced solvent solutions that chemically break down sticky residues without compromising glass clarity or introducing additional contaminants.
The complexity of adhesive removal extends beyond simple cleaning. Residual adhesive can attract dirt, create uneven surfaces, and potentially interfere with subsequent tint applications. Precision becomes paramount, requiring methodical approaches that protect the underlying glass surface while ensuring complete adhesive elimination.
Understanding these challenges underscores why professional intervention remains crucial in window tint removal. The intricate process demands technical expertise, specialised equipment, and a comprehensive understanding of automotive surface dynamics. Vehicle owners and professional installers alike benefit from recognising the nuanced complexities inherent in this seemingly straightforward automotive maintenance task.
Step-by-Step Process for Safe Tint Removal
Navigating the intricate process of window tint removal requires methodical preparation, precise techniques, and professional-grade equipment. Professional installers understand that successful tint removal goes far beyond simple mechanical extraction.
Preparation and Essential Equipment
Before initiating the tint removal process, professionals gather specialised tools that minimise potential damage. Explore our comprehensive window tinting solutions to understand the nuanced requirements of professional window film management. Critical equipment includes heat guns, razor blade scrapers with replaceable blades, spray bottles, quality microfibre cloths, and professional-grade adhesive removal solutions.
According to HowStuffWorks automotive experts, the preparatory phase involves creating a clean workspace with adequate ventilation. Protective gear such as chemical-resistant gloves, safety glasses, and potentially respiratory protection become essential when working with solvents and heat-based removal techniques.
Systematic Tint Film Removal Technique
The core removal process involves strategic heat application and controlled film extraction. Professionals recommend using a heat gun set at moderate temperature to soften the adhesive without risking glass damage. By maintaining consistent heat distribution and working in small, manageable sections, installers can gradually lift the tint film without causing structural compromise.
Critical steps include:
- Applying controlled heat evenly across the window surface
- Gently lifting film corners using precision scrapers
- Maintaining a 45-degree angle during film extraction
- Monitoring film tension to prevent unexpected tearing
Professionals recognise that patience significantly impacts successful removal. Rushing the process increases risks of glass scratching, incomplete film removal, and potential electrical mechanism damage.
Adhesive Residue Elimination
After film removal, addressing remaining adhesive becomes paramount. Specialised automotive adhesive removers break down sticky remnants without compromising glass integrity. Professionals typically apply solvent solutions systematically, allowing brief chemical interaction before carefully wiping with lint-free microfibre cloths.
The final cleaning phase involves multiple passes using automotive glass cleaner, ensuring complete removal of chemical residues and achieving a pristine, transparent surface. Professional installers understand that meticulous cleaning prevents future tint application complications and maintains optimal glass condition.
Mastering window tint removal demands technical skill, specialised knowledge, and unwavering attention to detail. While DIY approaches might seem tempting, the potential for costly mistakes underscores the value of professional intervention in maintaining automotive glass aesthetics and functionality.
Below is a process table summarising the critical steps professionals follow for safe window tint removal.
| Step | Description | Key Tips |
|---|---|---|
| 1. Preparation | Gather specialised tools; ensure clean, ventilated workspace; wear protective gear | Select heat gun, scrapers, adhesive removers; wear gloves, goggles |
| 2. Apply Heat | Use heat gun set at moderate temperature to soften adhesive | Even, consistent heat; avoid overheating glass |
| 3. Lift Tint Film | Start at the corners; use precision scraper to gently peel film | Maintain 45-degree angle; avoid tearing |
| 4. Remove Adhesive | Apply professional solvent; allow time to work | Use lint-free microfibre cloth, gentle wiping |
| 5. Final Cleaning | Multiple passes with glass cleaner for residue removal | Inspect for clarity; avoid streaks |
Essential Tools and Products for Professionals
Professional window tint removal demands a precise arsenal of specialised tools and advanced products that go beyond basic household equipment. Understanding the nuanced requirements of automotive glass maintenance separates expert installers from amateur practitioners.
Professional Heat and Removal Equipment
Explore advanced automotive detailing technologies to complement your professional toolkit. According to ClearPro automotive experts, heat guns and professional steamers represent critical investments for effective tint removal. These tools provide controlled, even heat distribution that softens adhesive without risking glass structural integrity.
Professional-grade heat guns typically feature adjustable temperature settings between 100-500 degrees Fahrenheit, allowing precise thermal management. Digital temperature controls enable installers to maintain consistent heat application across different window surfaces. Infrared thermometers complement these tools, helping professionals monitor surface temperatures and prevent potential glass damage.
Specialised Chemical Solutions and Cleaning Products
AP Tinting professionals emphasise the critical role of specialised adhesive removal solutions. These professional-grade chemicals break down stubborn window tint adhesives without compromising glass surfaces. Key products include:
- Citrus-based adhesive removers: Environmentally friendly solvents that effectively dissolve film residues
- Professional-grade isopropyl alcohol solutions: High-concentration formulations designed for automotive applications
- Specialized glass cleaning compounds: Engineered to remove chemical residues without leaving streaks
Chemical selection requires understanding substrate compatibility, environmental considerations, and specific automotive glass compositions. Professionals must evaluate product specifications, potential chemical interactions, and safety protocols before application.
Essential Supporting Equipment
Beyond primary removal tools, professionals rely on supplementary equipment to ensure precise, safe tint removal. According to Window Film Depot, critical supporting tools include:
- Precision plastic scrapers with replaceable blades
- High-quality microfibre cloths designed for automotive surfaces
- Chemical-resistant protective gloves
- Safety glasses with comprehensive eye protection
- Respiratory masks for chemical fume protection
Each tool serves a specific function in the comprehensive tint removal process. Plastic scrapers prevent glass scratching, microfibre cloths ensure residue-free cleaning, and protective gear safeguards the installer’s health and safety.
Professional window tint removal transcends simple mechanical extraction. It represents a sophisticated process requiring technical expertise, advanced equipment, and meticulous attention to detail. Investing in high-quality tools and understanding their precise applications separates professional installers from amateur enthusiasts, ensuring optimal results and maintaining automotive glass integrity.
The following table summarises essential professional tools and products used for safe and effective window tint removal.
| Tool/Product | Function | Professional Benefit |
|---|---|---|
| Heat gun (adjustable) | Softens tint adhesive for easier removal | Consistent, controlled heat prevents damage |
| Precision plastic scraper | Gently peels tint film without scratching glass | Maintains glass integrity |
| Automotive adhesive remover | Breaks down sticky film residues | Complete adhesive elimination |
| Microfibre cloth | Cleans glass surface and removes residues | Lint-free, streak-free finish |
| Protective gloves & glasses | Personal safety during chemical and heat handling | Prevents skin/eye irritation and injury |
| Spray bottle | Applies solvents or cleaners evenly | Controlled application, minimal waste |
Preventing Damage and Ensuring a Clean Finish
Professional window tint removal requires an intricate balance between precision technique and protective strategy. Automotive glass represents a significant investment, demanding meticulous care during film extraction to maintain its structural integrity and aesthetic quality.
Identifying and Mitigating Potential Risks
Explore professional surface protection techniques to understand comprehensive glass preservation methods. According to Windows Canada experts, the primary risks during tint removal include glass scratching, electrical component damage, and adhesive residue complications.
Professionals must perform a comprehensive pre-removal assessment, examining window surfaces for existing micro-abrasions, electrical mechanism vulnerabilities, and previous repair histories. This diagnostic approach allows targeted removal strategies that minimise potential damage. Critical risk evaluation points include:
- Checking for existing glass micro-scratches
- Identifying potential electrical mechanism proximity
- Assessing previous window repair or modification history
- Evaluating window seal and rubber gasket conditions
Precision Removal and Surface Protection Techniques
ClearPro automotive specialists emphasise the importance of systematic, controlled removal techniques. Professionals must maintain consistent heat application, use precision tools, and implement protective measures throughout the extraction process.
Key protective strategies include:
- Using plastic scrapers instead of metal implements
- Applying controlled, even heat distribution
- Working in small, manageable sections
- Maintaining minimal direct pressure on glass surfaces
- Employing multiple soft microfibre cloths for residue management
Post-Removal Surface Restoration
Metropolitan Tinting professionals recommend a comprehensive post-removal restoration protocol. This final phase ensures complete adhesive elimination, surface sanitisation, and preparation for potential future tint application.
The restoration process involves:
- Multiple cleaning passes using professional-grade glass cleaners
- Thorough inspection under various lighting conditions
- Applying specialised glass conditioning compounds
- Checking for any remaining adhesive residues
- Final surface clarity and smoothness assessment
Professional window tint removal transcends simple mechanical extraction. It represents a sophisticated process combining technical expertise, advanced diagnostic skills, and meticulous attention to detail. Understanding the complex interactions between removal techniques, glass substrates, and potential damage mechanisms separates professional installers from amateur practitioners.
Successful tint removal requires more than technical skill. It demands a holistic approach that prioritises automotive glass preservation, aesthetic quality, and long-term vehicle value. Professionals who master these nuanced techniques establish themselves as trusted experts in automotive surface management.
Frequently Asked Questions
What are the signs that window tint needs to be removed?
Old window tint often shows signs of bubbling, peeling, and discolouration. Assessing these physical deteriorations can help you anticipate challenges and avoid damage during removal.
Can I remove old window tint myself?
While DIY removal is possible, improper techniques can lead to scratches or permanent damage to your vehicle’s glass. It’s recommended to use professional tools and expertise to ensure a successful removal process.
What tools are necessary for safe tint removal?
Essential tools for safe tint removal include heat guns, precision plastic scrapers, professional adhesive removers, microfibre cloths, and protective gear like gloves and safety glasses.
How can I ensure there is no adhesive residue left after removing the tint?
Use specialised automotive adhesive removers designed to break down sticky residues without damaging the glass. Follow up with thorough cleaning using professional-grade glass cleaners to achieve a pristine surface.
Eliminate Old Tint Worries with AEONCUT Precision
Tired of stubborn old window tint and messy adhesive that waste your valuable time and risk scratching vehicle glass? The article above highlights the frustration of manual removal, uneven cuts, and the expensive danger of damaging glass surfaces. Most installers want every job to end with a glass-smooth finish and minimal material waste, but outdated methods make that difficult. What if you could skip these headaches and leap straight to flawless installations every time? For professionals and dedicated car enthusiasts alike, the right technology makes all the difference. Start with our specialised window tint solutions and feel the shift in quality and efficiency.

Turn tedious tint removal and reapplication into a streamlined, damage-free process. The AEONCUT software arms you with precision pre-cut patterns, unrivalled accuracy, and smart customisation tools to deliver better results with every install. Stop fighting with sticky residue and uneven edges. Explore our powerful digital pattern library and comprehensive support today to move your business or project ahead. Visit aeoncutsw.com now for instant access to cutting-edge window tint technology—because your work deserves a perfect finish.
Recommended
- 2025 Guide to Window Tint Colour Options for Industry Pros – AEONCUT PPF Pre-cut Cutting software
- How Window Tint Works: Essential Guide for Auto Professionals 2025 – AEONCUT PPF Pre-cut Cutting software
- Types of Window Tint: Guide for Installers and Dealers 2025 – AEONCUT PPF Pre-cut Cutting software
- What is Window Tint? Essential Guide for Tinting Pros 2025 – AEONCUT PPF Pre-cut Cutting software


