
Cutting window film might seem straightforward, especially with so many DIY tutorials promising quick results. Yet, despite the confidence of many amateurs, even a tiny error in measuring or tool selection can waste up to 20 percent of your film rolls. Here’s the surprise. Professionals do not rely on guesswork or ordinary knives. They have a few precision methods up their sleeves that transform what could be a frustrating task into a process as smooth as the glass itself.
Table of Contents
- Choosing The Right Tools For Cutting Window Film
- Preparing The Surface And Measuring Accurately
- Step-By-Step Guide To Cutting Window Film
- Avoiding Common Mistakes And Expert Tips
Quick Summary
| Takeaway | Explanation |
|---|---|
| Invest in high-quality cutting tools | Superior tools ensure clean, precise cuts and enhance installation quality, increasing professional reputation. |
| Prioritise thorough surface preparation | Meticulous cleaning prevents air bubbles and enhances film adhesion, crucial for lasting results. |
| Use precise measurement techniques | Accurate measurements, like digital tools, minimise waste and ensure a perfect fit when installing window film. |
| Allow for slight overhang during cuts | Cutting slightly larger than window size provides flexibility for trimming and precise adjustments during installation. |
| Avoid common installation mistakes | Be mindful of environmental conditions and use proper techniques to ensure successful window film application and long-term performance. |
Choosing the Right Tools for Cutting Window Film
Professional window film installation demands precision and the right equipment. Window film professionals understand that success hinges not just on technique but on selecting superior cutting tools that ensure clean, accurate results.
Professional Cutting Instruments for Precision
Cutting window film requires more than a basic utility knife. Professionals recommend investing in specialized tools that deliver exceptional precision and consistency. High-quality cutting instruments are crucial for achieving seamless installations without damaging the film or substrate.
Utility knives with snap-off blades represent the cornerstone of professional film cutting. These blades offer several critical advantages. They maintain razor-sharp edges, allowing clean cuts without excessive pressure. Professional installers typically prefer utility knives with stainless steel frames and ergonomic handles that provide superior grip and control during intricate cutting operations.
Essential Cutting Tool Characteristics
According to Concord Window Film, professionals should prioritize tools with specific characteristics:
- Blade Quality: Sharp, rust-free blades capable of making precise cuts without tearing
- Ergonomic Design: Comfortable handles reducing hand fatigue during extended installations
- Durability: Tools constructed from high-grade materials that withstand repeated use
Beyond utility knives, professionals rely on complementary tools like squeegees, heat guns, and measuring instruments. Squeegees help smooth film and remove air bubbles, while heat guns enable precise film contouring on complex surfaces. Measuring tools ensure accurate film sizing, minimizing waste and preventing costly mistakes.
Professional Maintenance and Tool Selection
Maintaining cutting tools is equally important as selecting them. Professionals regularly replace blade segments, clean tools after use, and store them in protective cases. Dull or damaged blades can compromise film integrity, leading to subpar installations.
For those seeking advanced cutting solutions for curved windows, exploring specialized software and pre-cut pattern technologies can significantly enhance precision and efficiency. These advanced tools reduce manual cutting complexities and minimize material waste.
Remember that investing in high-quality cutting tools is not an expense but a strategic investment in professional reputation and installation quality. The right tools transform window film application from a challenging task to a precise, repeatable process.
To help you compare the main types of professional window film tools and their features, here is a summary table:
| Tool Type | Key Features | Professional Benefits |
|---|---|---|
| Utility Knife | Snap-off blades, stainless frame, ergonomic handle | Precise, clean cuts; easy blade change |
| Squeegee | Flexible edge, various shapes | Smooths film, removes air bubbles |
| Heat Gun | Adjustable temp control | Helps shape film on curves |
| Metal Straightedge | Durable, non-slip | Guides accurate, straight cuts |
| Measuring Tools | Laser/digital, tape measures | Ensures accurate sizing, reduces waste |
| Blade Replacements | Segmented, easy snap-off | Maintains sharpness; prevents film damage |
| Templates/Software | Pre-cut, digital patterns | Increases speed; accuracy, minimises waste |
Preparing the Surface and Measuring Accurately
Successful window film installation begins long before the first cut. Professional installers understand that meticulous surface preparation and precise measurement are critical foundations for achieving flawless results.
Comprehensive Surface Cleaning Techniques
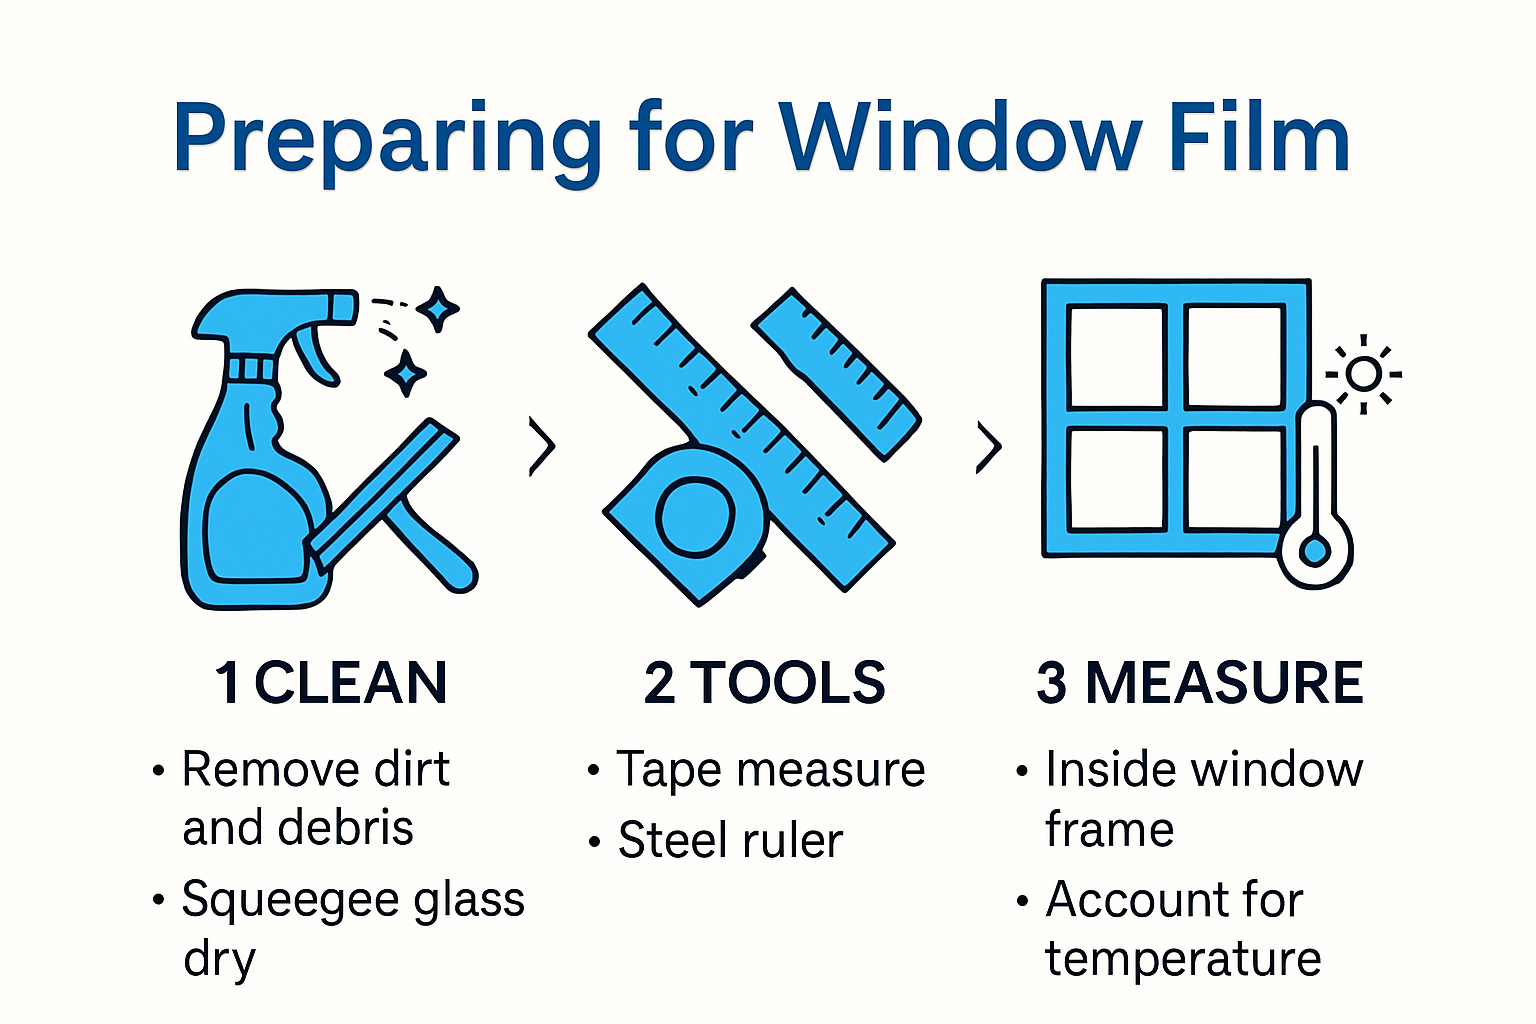
According to the National Renewable Energy Laboratory, proper surface preparation is fundamental to window film performance. Cleaning requires a systematic approach that goes beyond simple wiping. Professionals start by removing all dust, dirt, and debris using specialized cleaning solutions designed for glass surfaces.
A thorough cleaning process involves multiple steps. First, use a scrubbie pad or microfibre cloth to remove loose contaminants. Next, apply a professional-grade glass cleaner free from ammonia or harsh chemicals that might damage the film or window surface. Professionals recommend using a razor blade to carefully remove stubborn residue like paint specks or adhesive remnants, ensuring a completely smooth surface.
Precision Measurement Strategies
Premiumgard.com highlights the importance of accurate measurement as a critical step in window film installation. Measurement accuracy prevents material waste and ensures a perfect fit. Professional installers use multiple measurement techniques:
- Template Method: Creating paper or plastic templates of the window surface
- Digital Measurement: Using laser measuring tools for exact dimensions
- Direct Tracing: Carefully marking film dimensions directly on the protective liner
Utilizing digital measuring tools provides the most consistent results. Laser measuring devices offer centimeter-level precision, allowing installers to create exact film patterns. Some professionals combine digital measurements with manual tracing to double-check dimensions.
Advanced Preparation Techniques
Beyond basic cleaning and measuring, professionals implement additional preparation strategies. Humidity and temperature control play crucial roles in successful film application. Ideal installation conditions typically range between 10-32 degrees Celsius with moderate humidity.
For those seeking advanced window film application techniques, understanding environmental factors becomes essential. Professionals often use dehumidifiers or work in climate-controlled environments to ensure optimal film adhesion and minimize potential installation complications.
Remember that preparation is not just a preliminary step but a critical process that determines the quality and longevity of the window film installation. Investing time in thorough surface preparation and precise measurement separates professional results from amateur attempts.
The following table summarises professional surface preparation and measuring techniques for window film installation:
| Stage | Method/Tool | Purpose/Benefit |
|---|---|---|
| Initial Cleaning | Scrubbie pad, microfibre cloth | Remove dust, dirt, loose debris |
| Glass Cleaner Application | Ammonia-free professional cleaner | Eliminates contamination, protects film |
| Adhesive/Paint Removal | Razor blade | Creates smooth surface for adhesion |
| Measurement | Paper/plastic template | Accurate pattern for cutting |
| Measurement | Laser/digital tool | Precise sizing, minimises waste |
| Marking Cut Lines | Grease pencil/low-tack tape | Clear, non-damaging guide lines |
| Environmental Control | Dehumidifier, temp monitoring | Prevents adhesion issues, optimal conditions |
Step-by-Step Guide to Cutting Window Film
Cutting window film requires precision, patience, and a systematic approach. Professional installers understand that each step plays a crucial role in achieving a flawless final product.
Preparation and Initial Cutting Techniques
According to Angi’s professional guidelines, the initial cutting stage demands careful planning. Begin by laying the film on a clean, flat surface with the protective liner facing upwards. Use a clean cutting mat or smooth work surface that prevents blade damage and ensures clean cuts.
Professionals recommend leaving a slight overhang during initial cutting to accommodate potential measurement variations. Typically, this means cutting the film approximately 1-2 centimeters larger than the actual window dimensions. This extra margin provides flexibility during installation and allows for precise trimming.
Precision Cutting Methods
Reliant Energy suggests using specific cutting strategies that ensure accuracy. Start by marking your cut lines using a grease pencil or low-tack tape. These marking tools allow for clear guidelines without damaging the film’s surface.
Utilize a sharp utility knife with a fresh blade segment for each cutting session. Position a metal straightedge or cutting ruler alongside your marked line to guide the blade. Apply consistent, moderate pressure while cutting to prevent jagged edges or uneven cuts. Professional installers recommend making multiple light passes rather than attempting to cut through the film in a single aggressive stroke.
Advanced Cutting Techniques for Complex Surfaces
For more challenging window configurations, professionals employ specialized techniques. When working with curved windows, advanced cutting solutions become essential. Consider using digital templates or pre-cut pattern technologies that minimize manual cutting complexities.
Complex window shapes require additional considerations. Create paper templates of intricate window designs before cutting the actual film. This approach allows for test fitting and ensures precise measurements without wasting expensive window film materials. Some professionals use heat guns to help conform film to curved surfaces, but this requires significant skill and practice.
Key cutting considerations include maintaining blade sharpness, using consistent pressure, and working in a clean, well-lit environment. Always have replacement blade segments available and change blades frequently to maintain cutting precision. Minor imperfections during the cutting stage can significantly impact the final installation quality.
Remember that window film cutting is both a technical skill and an art form. Patience, practice, and attention to detail separate professional-grade installations from amateur attempts. Investing time in mastering precise cutting techniques will elevate your window film installation capabilities.
Avoiding Common Mistakes and Expert Tips
Window film installation demands precision and technical expertise. Professional installers understand that even minor errors can compromise the entire project, resulting in costly rework and unsatisfactory results.
Critical Installation Error Prevention
According to BCI Imaging Supplies, professional window film installation requires meticulous attention to detail. Common mistakes often stem from rushing the process, using improper tools, or neglecting fundamental preparation techniques.
One prevalent error is inadequate surface preparation. Professionals must thoroughly clean the glass surface, removing every trace of dust, dirt, and potential contaminants. Overlooking this step can lead to air bubbles, poor adhesion, and premature film failure. Use lint-free cloths and professional-grade cleaning solutions specifically designed for window film application.
Advanced Troubleshooting Techniques
U.S. Film Crew emphasizes the importance of precise installation methods that minimize potential complications. Professional installers develop strategies to address common challenges before they become critical issues.
Air bubble elimination requires specialized techniques. Use a professional-grade squeegee with a soft, flexible edge to systematically remove trapped air. Start from the center of the film and work outwards in smooth, consistent strokes. Professionals recommend using a heat gun at low temperatures to help the film conform to complex window surfaces, but this technique demands significant skill and practice.
Expert-Level Installation Strategies
Professionals understand that successful window film installation extends beyond technical skills. Environmental conditions play a crucial role in achieving optimal results. Ideal installation temperatures typically range between 10-32 degrees Celsius with moderate humidity levels.
For advanced window film application techniques, consider investing in digital pattern-cutting technologies that minimize manual errors. These advanced solutions provide precise templates for complex window configurations, reducing material waste and installation time.
Common mistakes to avoid include:
- Cutting film without allowing slight overhang
- Using dull cutting blades
- Applying film in dusty or humid environments
- Rushing the installation process
- Neglecting to check film compatibility with specific window types
Maintaining a clean workspace, using high-quality tools, and developing a systematic approach separates professional installers from amateurs. Each installation represents an opportunity to demonstrate technical expertise and commitment to quality.
Remember that window film installation is both a technical skill and an art form. Continuous learning, practice, and attention to detail will consistently elevate the quality of your professional installations.
Frequently Asked Questions
What tools are essential for cutting window film?
Invest in high-quality cutting tools such as a utility knife with snap-off blades, a metal straightedge for guiding cuts, squeegees for smoothing film, and heat guns for shaping film on complex surfaces.
How can I ensure accurate measurements when cutting window film?
Use multiple measurement techniques, including templates, laser measuring tools, and direct tracing on the film’s protective liner. Accurate measurements minimise waste and ensure a perfect fit.
What common mistakes should I avoid when installing window film?
Avoid rushing the installation process, using dull blades, and neglecting surface preparation. Ensure that the surface is thoroughly cleaned, and allow for slight overhang when cutting the film for precise adjustments during installation.
How do environmental conditions affect window film installation?
Ideal installation temperatures range between 10-32 degrees Celsius with moderate humidity. Working in these conditions enhances film adhesion and reduces potential complications during the installation process.
Master Precision with AEONCUT: The Future of Window Film Cutting Awaits
Frustrated with wasted film, uneven edges, or time-consuming manual templates? Whether you are building your professional reputation or aiming for flawless results every time, the pressure to deliver perfect precision can be overwhelming. Manual measuring and cutting techniques discussed in this article often leave even seasoned installers searching for a better solution—especially when accuracy and efficiency make all the difference.
Discover how the window Tint – AEONCUT PPF Pre-cut Cutting software transforms your window film process. By tapping into an extensive pattern library and advanced artificial intelligence, AEONCUT empowers you to cut the exact patterns you need—fast. No more guesswork. No more material waste. No more settling for less than perfect results.

Do not let manual errors cost you profit or peace of mind. Experience a demonstration or explore a subscription plan to fit your needs. Join other professionals already using AEONCUT for reliable, high-quality window tint patterns every single time. Ready to move beyond traditional cutting techniques? Visit aeoncutsw.com now and take control of your craft.
Recommended
- Tinting Curved Windows: Pro Tips and Solutions 2025 – AEONCUT PPF Pre-cut Cutting software
- Tinting Curved Windows: Pro Tips and Solutions 2025 – AEONCUT PPF Pre-cut Cutting software
- Heat Shrinking Window Tint: 2025 Guide for Installers – AEONCUT PPF Pre-cut Cutting software
- Heat Shrinking Window Tint: 2025 Guide for Installers – AEONCUT PPF Pre-cut Cutting software
- The Key to Controlling Color on Flexible Film – kolorguide
- How to ensure the screen protector is properly aligned on the device? – No Fuss Deal

