Removing old window film might seem like a simple weekend project for most homeowners. Surprisingly, using the wrong tools or skipping workspace prep can lead to costly glass scratches and stubborn adhesive that takes hours to clean. What most people miss is that a professional result comes down to one thing—methodical preparation before you even start peeling.
Table of Contents
- Step 1: Gather Your Required Tools And Materials
- Step 2: Prepare The Workspace For Safe Removal
- Step 3: Soften The Window Film For Easier Removal
- Step 4: Carefully Peel Off The Old Window Film
- Step 5: Clean The Glass Surface To Remove Residue
- Step 6: Inspect The Surface For Any Remaining Adhesive
Quick Summary
| Key Point | Explanation |
|---|---|
| 1. Gather essential tools efficiently | Assemble all required tools like scrapers and cleaning solutions to streamline the removal process. |
| 2. Prepare a safe workspace | Clear the area, use protective coverings, and ensure ventilation and lighting for a controlled environment. |
| 3. Apply heat for effective softening | Use a heat gun or hairdryer to loosen film adhesive without damaging the glass, creating an easier removal process. |
| 4. Peel the film delicately | Start at a corner and pull slowly to maintain a smooth, continuous film removal while avoiding damage to the glass. |
| 5. Inspect for adhesive residue | Conduct a thorough inspection under various lighting conditions to ensure no adhesive remains, ensuring a clean surface. |
Step 1: Gather Your Required Tools and Materials
Successfully removing old window film requires strategic preparation and the right equipment. Professional window film removal demands a methodical approach, starting with assembling your toolkit and understanding the specific requirements of your project.
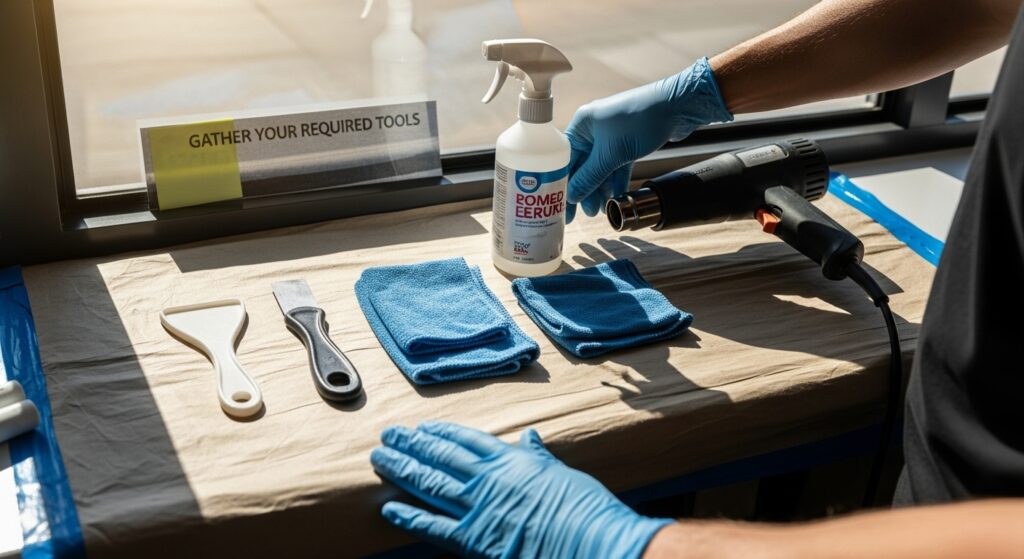
Before beginning the removal process, you will need to collect several essential tools that will make your task more efficient and manageable. Your core toolkit should include specific scraping instruments, cleaning solutions, and protective gear designed to handle delicate window surfaces without causing damage.
The fundamental tools for window film removal include:
- Sharp plastic scraper or specialised film removal blade
- High-quality spray bottle with water and mild soap solution
- Clean microfibre cloths
- Heat gun or hairdryer
- Protective work gloves
- Safety glasses
- Clean workspace covering like drop cloth or plastic sheeting
Quality matters when selecting your tools. Opt for professional-grade scrapers with replaceable blades that can handle different window film adhesives without scratching glass surfaces. Your plastic scraper should have a bevelled edge that allows gentle yet effective film lifting without gouging or damaging the underlying glass.
Preparing your workspace is equally crucial. Select a well-ventilated area with stable temperature and adequate lighting. Lay down protective coverings to catch film fragments and adhesive residue, preventing potential mess and making cleanup straightforward. Ensure you have a stable ladder or platform if working on windows above ground level, prioritising personal safety throughout the removal process.
Mental preparation is also key. Window film removal requires patience and precision. Understanding that the process might take longer than anticipated will help you approach the task methodically, reducing the likelihood of rushed mistakes that could compromise your window’s integrity.
By meticulously gathering your tools and establishing a structured workspace, you set the foundation for a successful window film removal project. Each carefully selected instrument represents a strategic step towards achieving a clean, professional result.
This table summarises the essential tools and materials for window film removal, including their primary purpose to ensure you choose suitable equipment for the task.
| Tool / Material | Specification / Example | Primary Purpose |
|---|---|---|
| Plastic scraper / Film removal blade | Bevelled edge, replaceable blades | Lifts and peels film without scratching glass |
| Spray bottle with mild soap solution | Water and a few drops of dish soap | Loosens adhesive during softening and cleaning |
| Microfibre cloths | Lint-free, high-quality | Wipes away residue and prevents scratching |
| Heat gun or hairdryer | Medium-high heat, adjustable setting | Softens film adhesive for removal |
| Protective gloves | Nitrile or latex | Protects hands from chemicals and sharp edges |
| Safety glasses | Clear, wrap-around style | Shields eyes from debris and cleaning solutions |
| Workspace covering (drop cloth/sheet) | Clean, paint-grade or plastic | Protects floors and surfaces from mess |
Step 2: Prepare the Workspace for Safe Removal
Preparing your workspace transforms the window film removal process from a potential disaster into a controlled, professional operation. Proper preparation protects your surfaces, minimises potential damage, and creates an environment conducive to precise film removal.
Begin by clearing the immediate area around your windows. Remove curtains, blinds, and any fragile decorative items that might obstruct your work or become damaged during the removal process. Protect surrounding surfaces by laying down clean drop cloths or plastic sheeting, ensuring complete coverage of floors, window sills, and adjacent wall areas. This protective barrier will catch adhesive residue, film fragments, and prevent potential staining or damage.
Ventilation plays a critical role in your workspace preparation. Open windows in adjacent rooms to create cross-air circulation, which helps disperse any chemical odours and keeps the working environment comfortable. If working indoors, consider using a fan positioned to direct air away from your immediate workspace, helping to maintain a clear and comfortable working environment.
Temperature management is another crucial consideration. Ideal window film removal typically occurs in moderate temperatures between 10 to 24 degrees Celsius. Extreme heat or cold can complicate the removal process, making adhesive more stubborn or causing potential glass stress. If possible, choose a time of day with consistent, mild temperatures.
For those interested in professional window film removal techniques, understanding workspace preparation is fundamental. Create a dedicated work zone that allows full access to the window surface, with enough room to manoeuvre your tools comfortably.
Key workspace verification checklist:
- Floor and surrounding surfaces completely covered
- All fragile items removed from immediate work area
- Proper ventilation established
- Consistent room temperature maintained
- Adequate lighting for detailed work
- All necessary tools within easy reach
Professional installers understand that workspace preparation is not merely a preliminary step but a critical component of successful window film removal.
Below is a checklist table to help verify your workspace is properly prepared before beginning window film removal.
| Preparation Task | Verification Point | Importance |
|---|---|---|
| Clear the area of all fragile items | No obstructions or breakable objects near windows | Prevents accidental damage |
| Cover floor and surrounding surfaces | Drop cloth or plastic sheeting in place | Protects from residue and debris |
| Ensure proper ventilation | Windows open or fan operating | Minimises chemical fumes |
| Maintain consistent room temperature | Temperature between 10-24°C | Eases film softening and removal |
| Check lighting conditions | Workspace is well-lit | Enables precise, safe work |
| Arrange tools within easy reach | Toolkit accessible and organised | Supports efficient workflow |
Remember that patience during preparation pays dividends in the actual removal stage. A well-prepared workspace reduces stress, minimises potential errors, and sets the stage for a smooth, professional film removal experience.
Step 3: Soften the Window Film for Easier Removal
Softening window film is a critical stage that transforms a potentially frustrating removal process into a smooth, controlled operation. This step requires precision, patience, and strategic application of heat and moisture to break down the film’s adhesive properties without damaging the underlying glass surface.
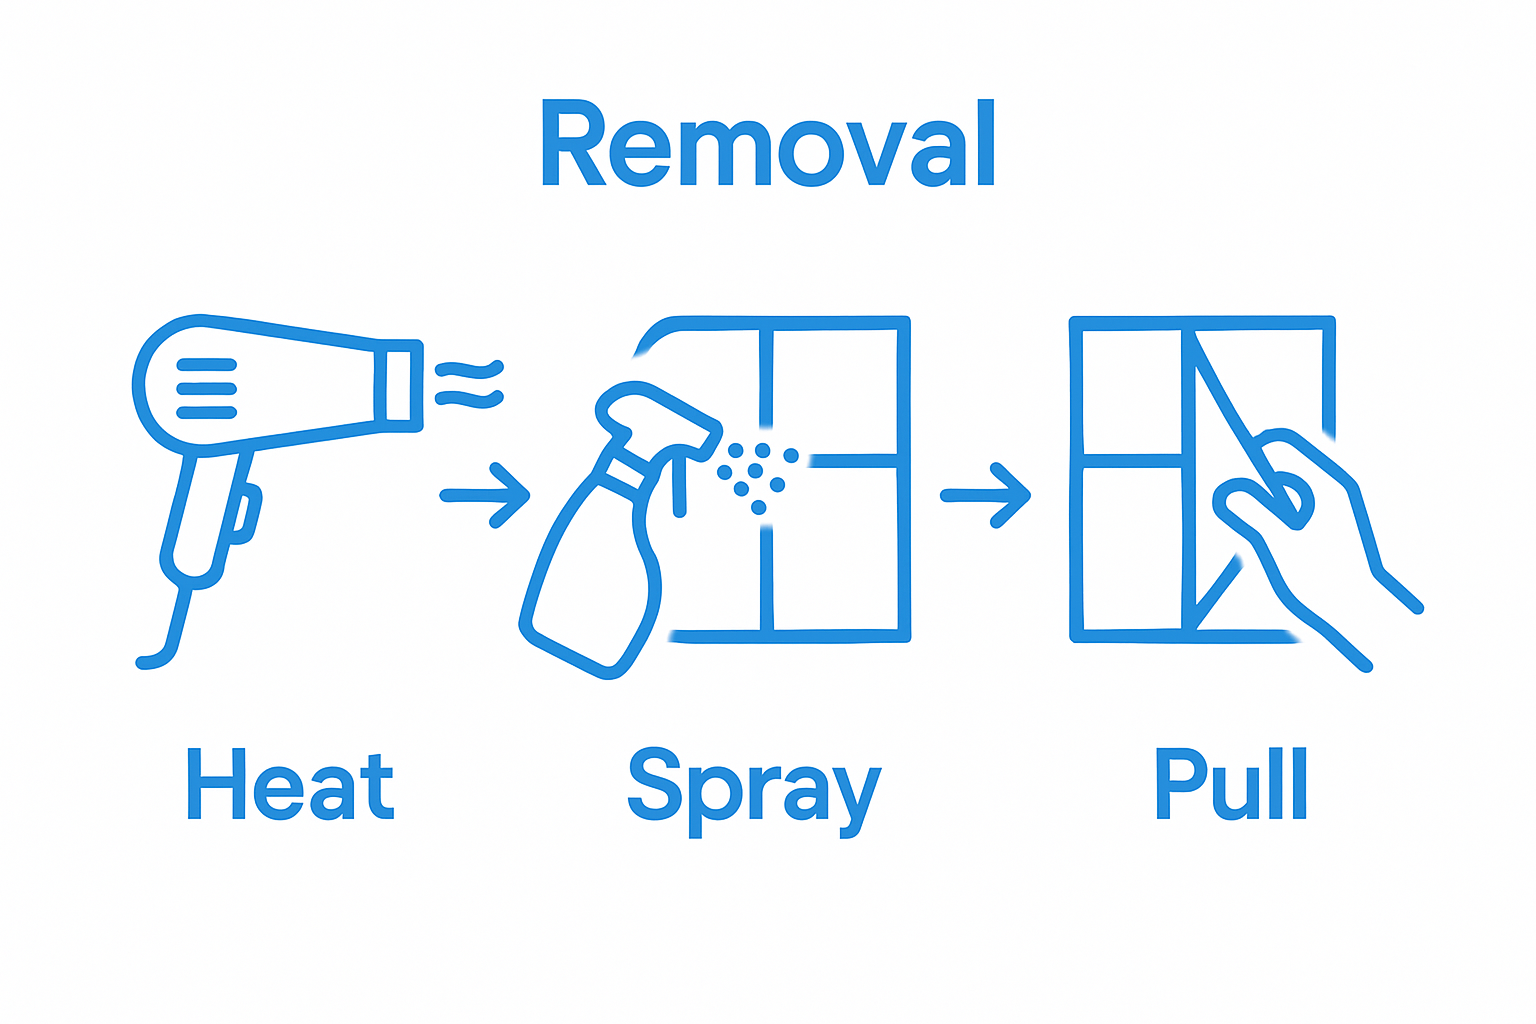
Heat application becomes your primary tool in weakening the film’s structural integrity. Professional installers recommend using a heat gun or high-quality hairdryer set at medium to high temperature, maintaining a consistent distance of approximately 15 centimetres from the window surface. Move the heat source in smooth, overlapping motions to distribute warmth evenly, preventing potential glass damage through concentrated heat exposure.
For those interested in advanced window film removal techniques, understanding the nuanced application of heat is crucial. The goal is not to melt the film but to create sufficient warmth that loosens the adhesive underneath, making subsequent removal significantly easier.
Parallel to heat application, moisture plays a complementary role in film softening. Prepare a spray solution combining warm water with a few drops of mild dish soap. This solution helps lubricate the film’s surface and further weakens the adhesive bond. Spray the solution generously across the film, allowing it to sit for several minutes to penetrate and soften the material.
Critical softening verification checkpoints:
- Film begins to appear slightly wrinkled or lifted at edges
- Adhesive feels less rigid when gently probed
- Surface temperature is warm but not excessively hot
- Spray solution has been evenly distributed
- No visible glass surface damage
Professional installers understand that each window film responds differently to heat and moisture. Older or more brittle films might require multiple heating cycles, while newer installations could soften more quickly. Patience is key. Rushing this stage risks tearing the film or leaving substantial adhesive residue behind.
Temperature and moisture create a delicate balance. Too much heat can potentially damage window seals or glass coatings, while insufficient warmth will leave the film stubbornly attached. Observe the film’s response carefully, adjusting your technique based on its specific characteristics.
Remember that softening is not about aggressive force but strategic, controlled preparation.
By methodically applying heat and moisture, you create optimal conditions for clean, efficient window film removal.

Step 4: Carefully Peel Off the Old Window Film
The film removal process demands precision, patience, and a strategic approach. Peeling window film requires a delicate touch, transforming what could be a frustrating task into a controlled, methodical operation. Your goal is to remove the film in complete, continuous sheets without leaving behind excessive adhesive residue or causing damage to the underlying glass surface.
Begin at a corner of the window film, preferably where you noticed earlier lifting or loosening during the softening stage. Use a plastic scraper with a sharp but flexible edge to gently lift the film’s corner. Angle the scraper at approximately 30 degrees, creating enough leverage to separate the film from the glass without applying excessive force.
For those seeking advanced window film removal techniques, understanding the nuanced approach to peeling is crucial. Pull the film slowly and consistently, maintaining a steady tension that prevents tearing or fragmenting. If the film begins to break or separate, stop immediately and reapply heat and moisture to the problematic area.
Professional installers recommend using one hand to hold the lifted film edge while the other guides the plastic scraper underneath, continuously separating the film from the glass surface. Work systematically across the window, maintaining uniform pressure and angle. The objective is to create a continuous, unbroken sheet of film that can be completely removed in one smooth motion.
Critical film removal verification points:
- Film peels away smoothly without significant resistance
- No glass surface scratching or damage observable
- Adhesive remains minimal and concentrated
- Film removal occurs in large, consistent sections
- Glass surface remains clean and intact
Should the film resist removal or begin fragmenting, do not force it. Return to the heat and moisture application stage, allowing additional time for the adhesive to soften. Some older or more stubborn films might require multiple heating cycles and patient manipulation.
Temperature variations can significantly impact film removal. Cooler environments might necessitate more extended heating periods, while warmer spaces could facilitate easier separation. Adapt your technique based on the specific environmental conditions and the film’s age and condition.
Remember that successful window film removal is about technique, patience, and controlled movements. By maintaining a steady, methodical approach, you transform a potentially challenging task into a precise, professional operation.

Step 5: Clean the Glass Surface to Remove Residue
Cleaning the glass surface after window film removal represents the final crucial stage in restoring your window to pristine condition. Adhesive residue can transform a professional removal into an unsightly mess if not handled with precision and the right techniques.
Begin by preparing a specialised cleaning solution combining warm water with a few drops of mild dish soap or rubbing alcohol. Professional installers recommend using a solution that breaks down adhesive without damaging glass coatings. For comprehensive cleaning techniques, understanding the delicate balance between effective cleaning and surface preservation is paramount.
Apply the cleaning solution using a microfibre cloth, working in systematic horizontal and vertical motions. The microfibre material provides superior cleaning capabilities without risking surface scratches. Avoid using paper towels or rough cleaning materials that could potentially damage the glass surface. Apply gentle, consistent pressure to lift and dissolve remaining adhesive particles.
For stubborn adhesive residue, a razor blade scraper can be an effective tool when used with extreme caution. Hold the blade at a precise 45-degree angle, using light, controlled strokes to remove tenacious remnants. Professional installers emphasise the importance of maintaining a constant, gentle angle to prevent accidental glass scratching.
Critical glass cleaning verification points:
- No visible adhesive residue remains
- Glass surface appears uniformly clean and streak-free
- No scratches or abrasions observable
- Surface feels smooth when gently touched
- Transparent area demonstrates complete film removal
Consider using a commercial adhesive remover specifically designed for glass surfaces if standard cleaning methods prove ineffective. These specialised solutions can dissolve challenging residue without risking glass damage. Always test any chemical solution on a small, inconspicuous area first to ensure compatibility with your specific glass type.
Temperature and humidity can significantly impact the cleaning process. Warmer, drier environments facilitate faster adhesive dissolution, while cooler or more humid conditions might require additional cleaning effort. Adapt your technique based on the specific environmental conditions you encounter.
Final inspection requires natural and artificial light to detect any remaining residue. Rotate your cleaning angle and examine the glass from multiple perspectives, ensuring a comprehensive and thorough cleaning process. Professional window film removal is as much about the final presentation as the removal technique itself.
Step 6: Inspect the Surface for Any Remaining Adhesive
Inspecting the window surface represents the critical final verification stage of your window film removal process. Professional-grade inspection requires a systematic and meticulous approach that goes beyond casual visual examination, ensuring every trace of adhesive has been effectively eliminated.
Begin your inspection by preparing optimal lighting conditions. Natural daylight provides the most revealing environment, but professional installers also recommend using a bright, angled LED light source to highlight even the subtlest adhesive remnants. Position yourself at multiple angles, rotating around the window to capture different perspectives that might reveal hidden residue patches.
For those seeking advanced surface inspection techniques, understanding the nuanced detection of microscopic adhesive traces is crucial. Run your fingertips lightly across the glass surface, feeling for any textural inconsistencies that visual inspection might miss. The tactile examination can reveal sticky spots or rough patches that indicate incomplete adhesive removal.
Utilise a clean, white microfibre cloth to perform a final residue test. Gently wipe the entire glass surface, rotating the cloth to reveal any transferred adhesive or discoloration. A pristine cloth after wiping indicates successful removal, while any visible transfer suggests additional cleaning is necessary.
Critical surface inspection verification points:
- No visible adhesive patches or streaks
- Glass surface feels uniformly smooth
- White cloth remains clean after wiping
- No sticky or rough areas detected
- Surface reflects light consistently
- No discoloration or hazy regions present
Professional installers recommend conducting the inspection under different lighting conditions. What appears clean under soft indoor lighting might reveal imperfections in direct sunlight. Move between indoor and outdoor environments, or use multiple light sources to ensure comprehensive examination.
Should you discover any remaining adhesive, return to the cleaning stage using a specialised adhesive remover. Apply the solution sparingly, working methodically to dissolve stubborn residue without causing glass damage. Patience during this final inspection stage separates professional-quality work from amateur attempts.
Remember that thorough inspection is not just about aesthetics but also about maintaining the structural integrity of your window. A meticulously cleaned surface ensures optimal performance and longevity of any future window film applications.
The following checklist table can be used during the glass cleaning and final inspection steps to ensure all adhesive residue is eliminated and the window is left pristine.
| Inspection Task | How to Verify | Why It Matters |
|---|---|---|
| No visible adhesive residue | Check under natural and angled artificial light | Ensures clear, streak-free glass |
| Smooth surface | Run fingertips over glass for tackiness or roughness | Verifies complete removal and cleanliness |
| No scratches or abrasions | Visual and tactile check | Maintains glass integrity |
| Clean microfibre cloth after wipe | Wipe with white cloth, check for transferred residue | Detects hidden adhesive spots |
| Uniform light reflection | Observe glass for consistent clarity | Reveals undetected residue or haze |
Transform Your Window Tint Removal Skills with AEONCUT Solutions
Struggling with stubborn adhesive residue or worried about damaging your glass during window film removal? Many professionals and DIY enthusiasts face headaches when tackling old window tint, from complex adhesive issues to time-consuming manual work. If you seek professional results with less effort, AEONCUT’s cutting-edge solutions can elevate your next project. Explore exclusive tips and industry innovation at our dedicated window tint resources.

Take control of every step, from precise removal to flawless re-application. With AEONCUT, you access premium pre-cut patterns, accurate pattern libraries, and AI-driven software designed for window tint perfection. Do not let poor preparation or outdated tools slow you down. Now is the perfect time to upgrade your technique and access professional-level efficiency. Visit our window tint category and the main website to discover how AEONCUT can make your next window film project smoother and more successful.
Frequently Asked Questions
What tools do I need to remove old window film?
To effectively remove old window film, gather the following tools: a sharp plastic scraper or specialised film removal blade, a high-quality spray bottle for a mild soap solution, clean microfibre cloths, a heat gun or hairdryer, protective gloves, safety glasses, and a clean workspace covering such as drop cloths or plastic sheeting.
How can I soften the window film before removal?
To soften window film, use a heat gun or hairdryer to gently warm the film at a distance of approximately 15 centimetres. Additionally, prepare a spray solution of warm water and mild dish soap and apply it generously to the film, letting it sit for several minutes to weaken the adhesive.
What techniques should I use when peeling off the window film?
Begin peeling the film from a corner where it is already loosened. Use the plastic scraper at a 30-degree angle to lift the film, while pulling it slowly and steadily to ensure it comes off in large sections without tearing. If you encounter resistance, reapply heat and moisture to the resisting area.
How do I clean the glass after removing the film?
Prepare a cleaning solution of warm water mixed with mild dish soap or rubbing alcohol. Use a clean microfibre cloth to apply the solution, cleaning in systematic motions. For stubborn adhesive residue, a razor blade scraper at a 45-degree angle can be used carefully, followed by a thorough wipe with the microfibre cloth to ensure no marks remain.
Recommended
- Removing Old Window Tint: Best Practices for 2025 – AEONCUT PPF Pre-cut Cutting software
- How to Cut Window Film: Precision Tips for Pros 2025 – AEONCUT PPF Pre-cut Cutting software
- Cutting Tint: Master the Art of Precision Tinting Techniques – AEONCUT PPF Pre-cut Cutting software
- Heat Shrinking Window Tint: 2025 Guide for Installers – AEONCUT PPF Pre-cut Cutting software


