Professionals in car care know that applying paint protection film is far from a simple task. Most people think a clean wash and steady hands are all you need, but the difference between a flawless finish and a peeling disaster starts long before the film touches the paint. Preparation, environment, and precision matter so much that even millimetre-level errors in cutting the film can ruin the final result. This is where real expertise shines and the smallest details make all the difference.
Table of Contents
- Step 1: Assess Vehicle Surface For PPF Application
- Step 2: Prepare The Environment And Materials Needed
- Step 3: Clean And Decontaminate The Car Surface
- Step 4: Cut And Prepare PPF For Installation
- Step 5: Apply PPF Carefully And Smooth Out Bubbles
- Step 6: Inspect The Finish And Perform Final Adjustments
Quick Summary
| Key Point | Explanation |
|---|---|
| 1. Thoroughly assess vehicle surface | Inspect the vehicle for paint imperfections like scratches or oxidation to ensure optimal adhesion of the PPF. |
| 2. Create a controlled environment | Maintain specific temperature and humidity levels during application to minimise contamination and ensure proper adhesion. |
| 3. Execute a comprehensive cleaning process | Implement a two-stage wash followed by advanced decontamination techniques for a flawless surface before applying PPF. |
| 4. Use precise cutting techniques | Employ advanced digital tools for accurate film cutting, ensuring each piece aligns perfectly with the vehicle’s contours. |
| 5. Conduct a meticulous final inspection | Inspect the applied film under optimal lighting, checking for imperfections or misalignments to guarantee a high-quality finish. |
Step 1: Assess Vehicle Surface for PPF Application
Assessing the vehicle surface represents the critical foundation for successful paint protection film (PPF) application. Professional installers understand that surface preparation determines the quality, durability, and aesthetic outcome of the entire PPF installation process. Before applying any protective film, a comprehensive surface evaluation ensures optimal adhesion and prevents potential complications.
The initial assessment begins with a meticulous visual and tactile inspection of the entire vehicle exterior. Professionals systematically examine each panel, looking for existing paint imperfections such as swirl marks, scratches, oxidation, or paint chips that could compromise the PPF application. Lighting plays a crucial role during this stage a bright, well-lit environment allows detailed identification of surface irregularities that might be invisible under standard conditions.
Comprehensive surface analysis requires specific tools and techniques. Recommended inspection tools include:
- Professional detailing light with multiple angle capabilities
- Clay bar testing kit
- Microfibre towels
- Surface inspection gloves
- Paint depth gauge
After visual inspection, professionals perform a clay bar test to assess surface contamination. Gently gliding a clay bar across the paint reveals embedded contaminants like industrial fallout, tree sap, or microscopic debris that standard washing cannot remove. The smoothness of the surface after clay bar treatment indicates readiness for PPF application. If the surface feels rough or contains significant contamination, complete decontamination and potential paint correction become necessary before film installation.
For those seeking more detailed insights into surface preparation, read more about PPF application techniques. A thorough surface assessment not only ensures superior PPF adhesion but also protects the vehicle’s aesthetic value by creating an immaculate foundation for the protective film.
Step 2: Prepare the Environment and Materials Needed
Environmental preparation stands as a critical precursor to successful paint protection film (PPF) application, demanding precision and strategic planning. Professional installers recognize that the workspace and material readiness significantly impact the quality and durability of the final installation. A meticulously prepared environment minimizes potential contamination, ensures optimal working conditions, and sets the stage for a flawless PPF application.
The ideal workspace requires controlled temperature and humidity conditions. Professionals recommend maintaining an indoor environment between 20-25 degrees Celsius with relative humidity around 40-50 percent. This controlled climate prevents dust particle migration, reduces static electricity, and ensures proper film adhesion. Dedicated installation areas should be enclosed, well-ventilated spaces away from external contaminants like wind, dust, and direct sunlight that could compromise the PPF application process.
Professional PPF installers must assemble a comprehensive toolkit before beginning the application. Essential materials include:
- High-quality microfibre towels
- Isopropyl alcohol (90 percent concentration)
- Precision cutting tools
- Squeegees with soft rubber edges
- Surface preparation solution
- Lint-free cleaning cloths
- Gloves and protective workwear
Beyond physical tools, professionals understand the importance of mental preparation and workspace organization. Explore advanced PPF installation techniques to enhance your precision and efficiency. Each tool should be strategically positioned for easy access, minimizing unnecessary movement during the installation process. Cleanliness is paramount every surface and tool must be immaculately clean to prevent potential contamination or imperfections in the final PPF application.
Verification of preparation involves a systematic checklist. Confirm the workspace is dust-free, tools are sanitized, temperature is consistent, and all necessary materials are within reach. A methodical approach transforms the PPF installation from a potential challenge into a streamlined, professional process.
Below is a table summarising the essential tools and materials required for professional PPF installation, along with their specific purposes during the process.
| Tool/Material | Specification/Type | Purpose |
|---|---|---|
| Microfibre towels | High-quality, lint-free | Drying, cleaning, preventing scratches |
| Isopropyl alcohol | 90% concentration | Degreasing, final surface preparation |
| Precision cutting tools | Ultra-sharp blades | Accurate film cutting, following digital patterns |
| Squeegees | Soft rubber edges | Smoothing film, removing bubbles and solution |
| Surface preparation solution | Specialist automotive formula | Prepping paint for adhesion |
| Lint-free cleaning cloths | Professional grade | Detailing, removing residues |
| Gloves and protective workwear | Nitrile/latex gloves, overalls | Preventing contamination, personal protection |
Step 3: Clean and Decontaminate the Car Surface
Cleaning and decontaminating the vehicle surface represents a pivotal stage in PPF application, transforming a seemingly mundane task into a precision-driven process that determines film adhesion and long-term performance. Professional installers understand that surface contamination can compromise the entire PPF installation, making thorough decontamination an absolute necessity.
The cleaning process begins with a comprehensive two-stage washing approach. Initial exterior washing requires premium automotive cleaning solutions specifically designed to remove surface contaminants without damaging the paint. Professionals recommend using pH-neutral car shampoos that effectively lift dirt and grime while preserving the paint’s integrity. Microfibre wash mitts with gentle, unidirectional movements prevent introducing additional swirl marks or scratches during the cleaning process.
Following the initial wash, professionals employ advanced decontamination techniques to remove embedded particles and industrial fallout. According to automotive surface preparation research, critical decontamination steps include:
- Chemical decontamination using iron removal solutions
- Clay bar treatment to extract microscopic contaminants
- Isopropyl alcohol wipe-down to eliminate residual oils
- Final surface inspection under bright lighting
After mechanical and chemical decontamination, professionals perform a tactile surface assessment. Running clean, gloved hands across the paint reveals any remaining imperfections that might interfere with PPF adhesion. For those seeking additional insights into professional detailing techniques, explore comprehensive cleaning strategies. The goal is achieving an immaculately clean surface that provides a perfect foundation for paint protection film installation.

Verification involves a meticulous final inspection. A clean surface should feel smooth like glass, with no rough spots, embedded contaminants, or residual oils. Professional installers understand that this preparatory stage is not merely about cleanliness but creating an optimal surface for PPF application that ensures maximum longevity and aesthetic perfection.
Step 4: Cut and Prepare PPF for Installation
Cutting and preparing paint protection film represents a precision-driven process that demands meticulous attention to detail and professional expertise. Professional installers recognize this stage as the critical juncture where digital precision meets practical application, transforming raw film into a perfectly tailored protective layer for each unique vehicle surface.
The preparation begins with precise digital pattern generation, leveraging advanced cutting software that provides exact measurements and template designs. Professionals use sophisticated digital tools that eliminate the guesswork associated with traditional hand-cutting methods. Explore advanced PPF pattern creation techniques to understand the nuanced approach required for seamless film installation.
According to automotive surface preparation research, critical cutting preparation involves several sophisticated techniques:
- Using fresh, ultra-sharp cutting blades
- Maintaining consistent blade angle
- Allowing slight excess material for complex curves
- Implementing careful tension control during cutting
Professional installers approach PPF cutting with surgical precision, understanding that even millimeter-level discrepancies can compromise film performance. The cutting process requires a stable, clean workspace with appropriate lighting that reveals subtle contours and potential cutting challenges. Specialized cutting mats, precision cutting tools, and magnification devices help ensure each film section meets exacting standards.
Verification involves a comprehensive inspection of cut pieces. Each PPF section must display clean, precise edges without fraying or inconsistent margins. Professionals carefully examine cut pieces against the vehicle’s specific panel measurements, ensuring absolute alignment and minimal waste. The goal transcends mere cutting it represents creating a protective film that appears seamlessly integrated with the vehicle’s original paintwork.
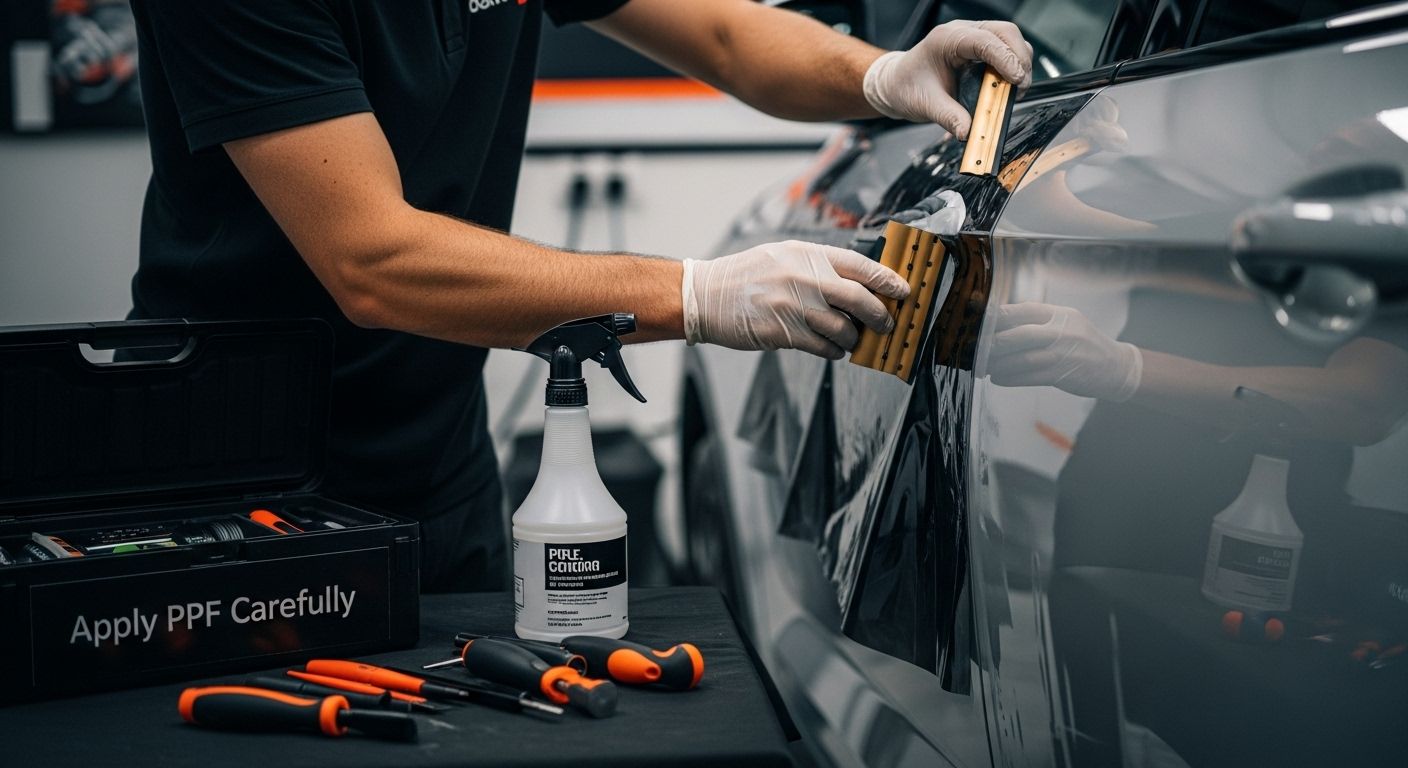
Step 5: Apply PPF Carefully and Smooth Out Bubbles
Applying paint protection film represents the most delicate stage of the entire installation process, where technical skill meets artistic precision. Professional installers understand that successful PPF application demands patience, controlled movements, and advanced techniques to achieve a flawless, bubble-free finish that appears seamlessly integrated with the vehicle’s surface.
The application begins with creating an optimal working environment, which involves carefully spraying the surface with a specialized installation solution that allows the film to float and be positioned precisely. Wet application techniques enable more forgiving positioning, allowing professionals to adjust the film without immediate adhesion. Professionals use soft, lint-free squeegees to methodically press the film, starting from the center and working outwards in smooth, deliberate strokes that systematically eliminate air and liquid trapped beneath the surface.
According to automotive surface preparation research, critical bubble elimination techniques include:
- Using consistent, moderate pressure with squeegee
- Maintaining a 45-degree angle during film manipulation
- Implementing heat gun techniques for complex curves
- Working in small, manageable sections
- Avoiding aggressive pushing that might tear film
Professionals recognize that different vehicle panels require unique application strategies. Flat surfaces demand different techniques compared to curved areas like side mirrors or complex bodywork contours. Learn about avoiding common PPF installation mistakes to understand the nuanced approach required for seamless application. Precision heat application helps the film conform to intricate curves, with professionals carefully controlling temperature to prevent film damage while ensuring optimal adhesion.
Verification involves a meticulous post-application inspection. Professionals examine the film under bright lighting, looking for microscopic imperfections, remaining bubbles, or slight lifting at edges. The goal transcends mere coverage it represents creating a protective layer that appears indistinguishable from the original paint surface.
Step 6: Inspect the Finish and Perform Final Adjustments
The final inspection stage represents the ultimate validation of professional PPF installation, where meticulous attention to detail transforms a good application into an exceptional result. Professional installers understand that this critical phase separates outstanding work from mediocre performance, requiring a systematic and comprehensive evaluation of the entire film installation.
Professionals begin the inspection process by creating optimal lighting conditions that reveal even the most minute imperfections. Bright, diffused lighting at multiple angles exposes potential issues like micro-bubbles, edge lifting, or subtle misalignments that might be invisible under standard conditions. Specialized inspection lights with adjustable intensities help professionals identify areas requiring refined adjustments, ensuring a flawless finish that meets the highest industry standards.
According to professional coating inspection research, critical final inspection techniques include:
- Systematic panel-by-panel comprehensive review
- Using tactile and visual examination methods
- Checking film edges for precise alignment
- Verifying consistent film thickness
- Examining complex curve transitions
Professional installers leverage advanced techniques to address any remaining imperfections. Precision heat application and specialized squeegee methods allow for final refinements, gently manipulating the film to eliminate residual bubbles or slight misalignments. Explore advanced PPF installation techniques to understand the nuanced approach required for achieving a seamless finish.
Verification involves a comprehensive checklist that goes beyond visual inspection. Professionals assess film adhesion, edge integrity, and overall surface uniformity. The ultimate goal transcends mere coverage it represents creating a protective layer that appears completely integrated with the vehicle’s original paintwork, providing both aesthetic excellence and superior protection.
This checklist table helps professionals verify each critical aspect of the applied PPF, ensuring a flawless and high-quality finish before completing the installation.
| Inspection Area | Criteria for Completion | Verification Method |
|---|---|---|
| Panel Surface | Free from bubbles, haze or contamination | Visual/tactile under bright light |
| Film Edges | Consistent, aligned, fully adhered | Inspect up close, gentle test |
| Curved Areas | Proper conformity, no lifting or stress marks | Visual, slight finger pressure |
| Film Thickness | Even coverage without stretching or thinning | Visual/feel, reference gauges |
| Adhesion | No air pockets, lifting, or incomplete contact | Gentle lifting test, up-close |
| Overall Appearance | Seamless integration, indistinguishable from paint | Full surface observation |
Transform PPF Installation with Precision Pre-Cut Patterns
You have followed each meticulous step in professional paint protection film application, only to realise how much hinges on accuracy, time efficiency, and a flawless pattern fit. Struggling with complex cuts, reducing wasted material, and ensuring seamless results can drain your resources. The right cutting technology is the missing piece. Discover how PPF precut pattern solutions from AEONCUT empower you to achieve perfect adhesion and finish on every panel. Whether you want to eliminate guesswork, optimise your workflow, or impress clients with consistent quality, our software makes high-precision PPF cutting effortless and reliable.

Ready to elevate your PPF installs and eliminate costly errors? Explore the full range of Paint Protection Film tools and cutting software at aeoncutsw.com. Take charge of every detail and upgrade your professional game today.
Frequently Asked Questions
What is the importance of assessing the vehicle surface before applying PPF?
Assessing the vehicle surface is crucial as it ensures optimal adhesion, quality, and durability of the PPF. Surface imperfections like swirls, scratches, and contaminants can compromise the film’s performance and aesthetic outcome.
How should I prepare the environment for a successful PPF installation?
A controlled environment with a stable temperature of 20-25 degrees Celsius and humidity around 40-50% is ideal. This helps prevent dust contamination, enhances film adhesion, and improves installation conditions.
What techniques are recommended for cleaning and decontaminating the car surface?
A two-stage washing process using pH-neutral car shampoos followed by chemical decontamination, clay bar treatment, and isopropyl alcohol wipe-down are essential for achieving a smooth, clean surface ready for PPF application.
How can I ensure a bubble-free finish during the PPF application?
Using wet application techniques allows the film to float for easier positioning. Applying consistent, moderate pressure with a squeegee, working in small sections, and using a heat gun for complex curves helps eliminate bubbles and achieve a seamless finish.
Recommended
- Building a PPF Business in 2025
- Building a PPF Business in 2025
- How Does PPF Work? Guide for Car Care Pros 2025
- Building a PPF Business in 2025


