Vehicle wrap shops often struggle with piles of wasted film and rising material costs, even as they chase efficiency gains. Surprisingly, accurate waste assessment is the foundation of meaningful waste reduction strategies, not just fancy tech. Most installers jump straight to buying new software or equipment, yet the real breakthrough comes from a step almost everyone overlooks: meticulous tracking and understanding of every scrap lost before making a single upgrade.
Table of Contents
- Step 1: Assess Current Film Waste Levels
- Step 2: Install and Configure Precut Software
- Step 3: Input Vehicle Templates and Dimensions
- Step 4: Generate Custom Cut Files
- Step 5: Execute Material Cuts with Precision
- Step 6: Review Waste Reduction Results
Quick Summary
| Key Point | Explanation |
|---|---|
| 1. Assess your film waste levels first | Conduct a detailed audit of your film usage to establish a baseline for waste reduction efforts, tracking both total and usable materials. |
| 2. Choose compatible precut software | Ensure the selected software integrates well with your current systems and is capable of enhancing cutting precision and efficiency. |
| 3. Accurately input vehicle dimensions | Use precise measurement tools to input accurate vehicle templates, enhancing pattern generation and minimizing material waste. |
| 4. Generate intelligent cut files | Utilize advanced nesting algorithms to create optimized cutting patterns that maximise material use while accommodating vehicle complexities. |
| 5. Review waste reduction results systematically | Compare pre- and post-implementation waste metrics to quantify material savings and workflow improvements, enabling further optimisation. |
Step 1: Assess Current Film Waste Levels
Reducing film waste begins with understanding your current consumption and waste patterns. Professional vehicle wrap and PPF installers must develop a systematic approach to measuring material inefficiency before implementing any technological solutions. Accurate waste assessment is the foundation of meaningful waste reduction strategies.
Start by conducting a comprehensive audit of your current film usage over a specific period, typically one month. Document every film roll used, tracking not just the total square metres purchased, but critically examining how much material ends up as actual usable coverage versus discarded remnants. This means carefully weighing and measuring waste pieces, recording their dimensions, and calculating the percentage of film that does not contribute to completed installations.
To streamline this process, create a detailed tracking system that captures key metrics. Measure the total film roll size, track the actual vehicle surface area covered, and record the size and quantity of waste fragments. Pay special attention to common waste generation points such as complex curve sections, intricate body panel cuts, and initial alignment attempts. Learn more about precision cutting techniques with our professional guide.
Your waste assessment should include both quantitative measurements and qualitative observations. Look beyond simple volume calculations and understand the root causes of material loss. Are waste fragments primarily generated from challenging vehicle geometries? Do installation technique limitations contribute to increased material consumption? Identifying these nuanced factors provides insights that raw numerical data cannot reveal.
By meticulously documenting your current film waste levels, you establish a critical baseline for future improvements. This data becomes your benchmark against which you can measure the effectiveness of precut software solutions, ultimately driving more sustainable and cost effective vehicle protection film installations.
Step 2: Install and Configure Precut Software
After establishing your baseline waste measurements, the next critical phase involves selecting and implementing precut software that aligns with your specific automotive film installation requirements. Professional configuration is key to maximizing waste reduction potential. This step transforms your workshop’s technological capabilities, moving from manual cutting techniques to precision digital pattern generation.
Begin by evaluating software compatibility with your existing computer systems and cutting equipment. Most professional precut solutions require a robust computer with sufficient processing power, adequate graphics capabilities, and reliable internet connectivity for pattern library updates. Explore professional software options tailored for PPF installers to ensure you select a platform matching your workshop’s technical infrastructure.
The installation process typically involves downloading the software from an official website, running the installation executable, and completing a series of configuration steps. During installation, pay close attention to system requirements and potential software integration challenges. Some platforms might necessitate specific driver installations or compatibility checks with existing cutting machinery. Professional workshops should consider scheduling the installation during a low production period to minimise operational disruptions.
Configuration extends beyond mere software installation. Calibrate the software precisely by inputting your specific cutting machine specifications, including blade type, cutting width, and material handling characteristics. This ensures that generated cutting patterns are not just theoretically accurate but practically executable on your specific equipment. Many advanced precut software platforms offer diagnostic tools that allow you to verify cutting precision, enabling fine tuning of machine parameters directly within the software interface.
Successful configuration is demonstrated through several key verification steps. Generate test cutting patterns for vehicles with complex geometries, compare digital designs against actual material usage, and assess the precision of pattern nesting. The ultimate benchmark is a noticeable reduction in material waste and improved installation efficiency, transforming your workshop’s operational methodology from traditional manual cutting to data driven, precision focused film application.
Step 3: Input Vehicle Templates and Dimensions
Precision begins with accurate data entry, transforming your digital workflow into a streamlined film application process. Accurate vehicle template input is the cornerstone of minimizing material waste through intelligent pattern generation. This crucial step requires meticulous attention to detail and a systematic approach to capturing vehicle surface geometries.
Commence by selecting the specific vehicle make, model, and year within your precut software platform. Modern systems typically feature extensive databases with pre existing templates, enabling rapid selection and reducing manual measurement requirements. Explore our comprehensive guide on creating custom vehicle patterns if your particular vehicle configuration is not immediately available in the standard library.
Careful measurement becomes critical when working with vehicles that have unique modifications or rare configurations. Professional installers should employ digital measuring tools like laser measurement devices or professional grade photogrammetry systems to capture precise panel dimensions. These tools provide millimetre accurate measurements that translate directly into cutting patterns, ensuring maximum material efficiency. Focus on capturing not just overall vehicle dimensions, but intricate details like panel curve radii, edge transitions, and potential complex geometric intersections.
The accuracy of vehicle template input directly correlates with material waste reduction, making this step fundamental to achieving significant efficiency improvements. Professional installers must verify template accuracy by cross referencing multiple measurement methods and potentially overlaying digital templates against physical vehicle surfaces. Some advanced precut software platforms offer visual verification tools that highlight potential measurement discrepancies, allowing real time adjustments before film cutting commences.
Successful template and dimension input is demonstrated through precise digital representations that match physical vehicle contours with minimal deviation. The ultimate validation comes from generating test cutting patterns that align perfectly with actual vehicle surfaces, minimizing material overlap and reducing unnecessary waste fragments during the installation process.
Step 4: Generate Custom Cut Files
Generating custom cut files represents the transformative moment where precise digital measurements translate into optimized film cutting patterns. Intelligent file generation is the critical bridge between vehicle measurements and material efficiency. This stage demands strategic decision making to maximize film utilization and minimize waste.
Initiate the process by selecting the appropriate cutting profile within your precut software. Professional installers must carefully review digital representations, ensuring that generated patterns account for specific vehicle panel complexities, material stretch characteristics, and installation requirements.
Explore our comprehensive guide for creating custom PPF patterns to understand nuanced pattern generation techniques.
Advanced nesting algorithms can significantly improve material utilization by strategically positioning cutting patterns to minimize unused film fragments. Modern precut software employs sophisticated computational techniques that analyze panel shapes, automatically rotating and positioning templates to maximize usable material coverage. This intelligent approach goes beyond simple geometric placement, considering factors like material grain direction, potential stretch zones, and seamless integration points.
Professional installers should leverage software features that allow manual fine tuning of automatically generated patterns. This might involve adjusting overlap margins, compensating for specific vehicle model peculiarities, or making minute corrections based on years of hands on installation experience. The goal is creating cut files that not only fit perfectly but do so with minimal material waste.
Successful custom cut file generation is verified through several key indicators. These include minimal material remnant sizes, precise panel coverage matching, and a significant reduction in manual trimming requirements. The ultimate validation comes from test cuts that demonstrate near perfect alignment with vehicle surfaces, proving that the digital design translates seamlessly into physical film application with maximum efficiency and minimal material loss.
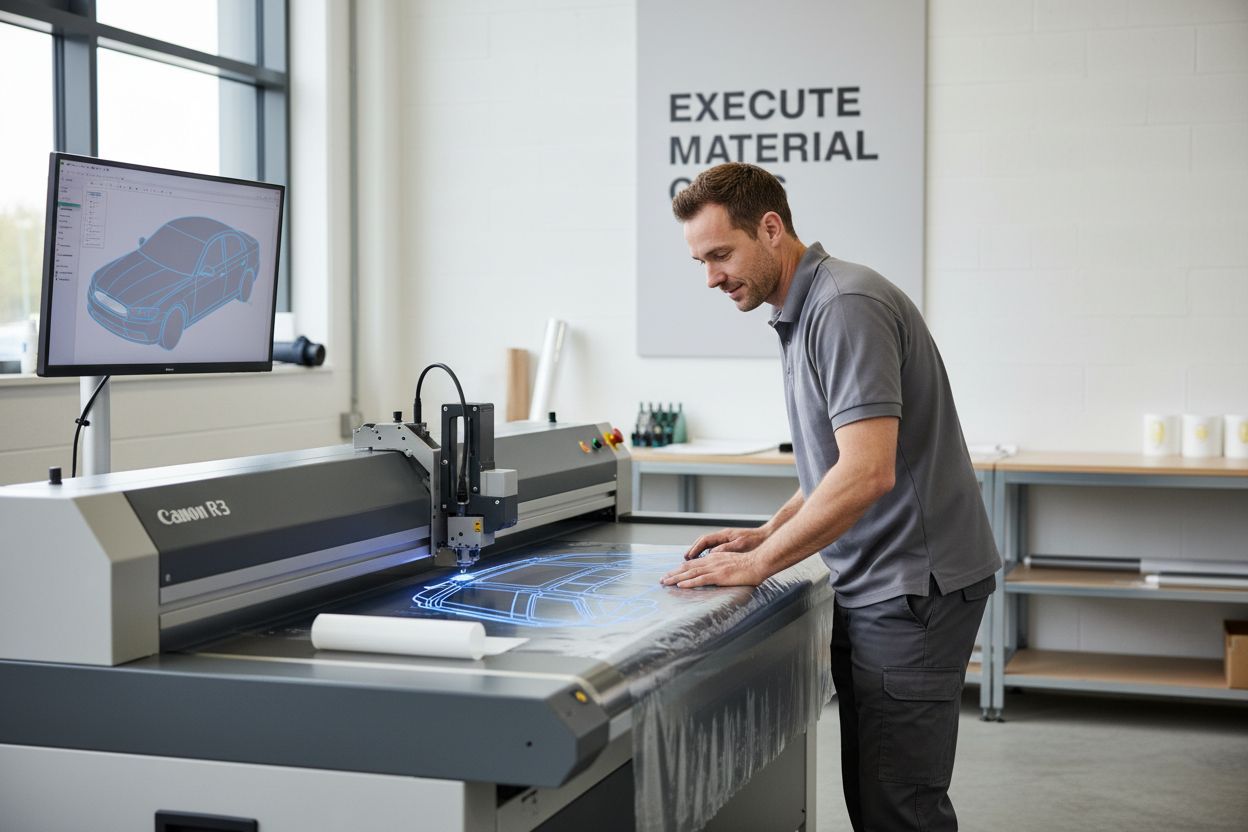
Step 5: Execute Material Cuts with Precision
Precision cutting represents the critical moment where digital designs transform into tangible film patterns, determining the ultimate success of waste reduction strategies. Executing material cuts demands technical expertise and unwavering attention to detail, translating sophisticated software calculations into physical film segments with minimal margin for error.
Begin by calibrating your cutting machine precisely, ensuring blade sharpness, tension settings, and alignment match the specifications outlined in your digital cut files. Professional installers understand that even microscopic deviations can significantly impact material utilization. Explore our detailed case study on material cost optimization to understand the nuanced techniques top performing workshops employ during the cutting process.
Advanced machine guided cutting techniques dramatically enhance cut quality and raw material optimization, making precise execution fundamental to waste reduction. Professional installers must maintain consistent cutting speed, applying uniform pressure that allows the blade to traverse film surfaces without unnecessary stretching or distortion. Modern precut software provides real time feedback, enabling minute adjustments during the cutting process to compensate for potential material inconsistencies.
Careful monitoring extends beyond the immediate cutting operation. Observe how individual film segments separate from the main roll, checking for clean edges, minimal material stress, and accurate dimensional conformity to the original digital template. Experienced professionals develop an intuitive sense for detecting potential cutting irregularities, understanding that seemingly minor imperfections can compound into significant material waste.
Successful precision cutting is validated through comprehensive quality assessment. Examine each cut segment for smooth edges, accurate dimensions, and minimal material distortion.
 The ultimate benchmark is achieving film patterns that require minimal additional trimming, demonstrating that your digital design and physical execution have harmonized to create an efficient, waste reducing workflow.
Step 6: Review Waste Reduction Results
The culmination of your precut software implementation arrives with a comprehensive review of waste reduction performance, transforming raw data into actionable insights. Systematic evaluation reveals the tangible financial and environmental benefits of your technological investment, providing concrete evidence of operational improvements beyond mere theoretical projections.
Initiate the review process by comparing pre implementation and post implementation waste measurements. Quantify film waste by weighing remnant fragments, calculating square metre percentages, and tracking material consumption across multiple vehicle installations. Professional installers should develop a meticulous documentation system that captures granular details about each cutting session, enabling precise comparative analysis.
Systematic review of waste reduction results through data analysis provides critical evidence of software effectiveness, highlighting potential areas for further optimization. Calculate key performance indicators such as material utilization rate, average waste percentage per vehicle type, and cost savings achieved through reduced film consumption. Advanced precut software platforms often include built in analytics tools that automatically generate comprehensive reports, simplifying the evaluation process.
Professional workshops must look beyond simple numerical metrics, examining qualitative improvements in installation precision and workflow efficiency. Consider factors like reduced manual trimming time, improved pattern consistency, and enhanced overall installation quality. These holistic performance indicators demonstrate that waste reduction is not merely about material savings but represents a comprehensive upgrade to your operational methodology.
Successful waste reduction review is characterized by clear, documented improvements that substantiate the investment in precut technology. The ultimate validation comes from tangible evidence showing consistent material waste reduction, improved operational efficiency, and measurable financial benefits.
 Professional installers who approach this review systematically will not only quantify their achievements but also identify strategic opportunities for continuous improvement in their vehicle film application processes.
The following table provides an overview of the step-by-step process to implement precut software for reducing film waste, including the core action and key outcome for each phase.
| Step | Core Action | Key Outcome |
|---|---|---|
| 1. Assess Current Film Waste | Audit film usage and waste | Establish baseline for reduction |
| 2. Install and Configure Software | Select and set up compatible precut software | Enable precision digital cutting |
| 3. Input Vehicle Templates and Dimensions | Enter exact vehicle data and measure accurately | Generate precise cut patterns |
| 4. Generate Custom Cut Files | Use advanced algorithms for pattern creation | Maximise material usage, minimise waste |
| 5. Execute Material Cuts with Precision | Properly calibrate and cut materials | Achieve clean, accurate cuts with minimal remnants |
| 6. Review Waste Reduction Results | Systematically compare waste metrics pre- and post-implementation | Quantify savings and efficiency gains |
Achieve Real Waste Reduction with Proven Precut Technology
Still struggling with piles of wasted film, inconsistent cuts, or unpredictable installation costs? The article above highlights how traditional approaches lead to unnecessary expense and inefficiency. Professional installers and ambitious car enthusiasts both face the challenge of reducing film waste while maintaining precise, flawless results. Discover a smarter solution by exploring our PPF software, designed specifically to tackle the pain points discussed—material inefficiency, inaccurate patterning, and wasted time.

Experience measurable results with AEONCUT, the cutting-edge software driven by AI-powered auto-nesting and extensive pattern libraries. Try unlimited pattern access, ongoing cloud updates, and hands-on support—all engineered to help you cut waste and boost your bottom line. See for yourself how much you could save—visit our Featured solutions and start making every metre of film count today. Transform your workshop’s precision and efficiency NOW with AEONCUT.
Frequently Asked Questions
How does precut software help in reducing film waste?
Precut software reduces film waste by generating precise cutting patterns based on accurate vehicle measurements, optimising material usage and minimising leftover remnant pieces during installation.
What steps are involved in implementing precut software for film installations?
Implementing precut software involves assessing current film waste levels, installing and configuring the software, inputting vehicle templates, generating custom cut files, executing material cuts, and reviewing waste reduction results.
How accurate must vehicle measurements be when using precut software?
Vehicle measurements must be highly accurate, ideally within millimetre precision, as inaccuracies can lead to increased material waste. Tools such as laser measuring devices or photogrammetry systems can enhance measurement precision.
What are the benefits of using advanced nesting algorithms in precut software?
Advanced nesting algorithms optimise the arrangement of cutting patterns on film rolls, significantly improving material utilisation and reducing waste by ensuring that patterns are positioned to minimize unused fragments.
Recommended
- AI AutoNest in PPF Cutting: How Aeoncut Saves Time & Material – AEONCUT PPF Pre-cut Cutting software
- Case Study: How Aeoncut Helped a Shop Save 20% on Material Costs – AEONCUT PPF Pre-cut Cutting software
- Case Study: How Aeoncut Helped a Shop Save 20% on Material Costs – AEONCUT PPF Pre-cut Cutting software
- Case Study: How Aeoncut Helped a Shop Save 20% on Material Costs – AEONCUT PPF Pre-cut Cutting software

