Every british car owner wants a window tint that looks flawless and lasts for years, yet over 60 percent of poor results are linked to missed steps in the installation process. Proper preparation, precise cleaning, and expert application set the difference between a professional finish and costly do-overs. This guide breaks down each stage to help you achieve showroom-quality results that meet even the highest industry standards.
Table of Contents
- Step 1: Prepare The Work Area And Materials
- Step 2: Clean And Inspect All Glass Surfaces
- Step 3: Measure And Pre-Cut Tint Patterns Accurately
- Step 4: Apply Tint Using Professional Techniques
- Step 5: Verify Installation Quality And Ensure Durability
Quick Summary
| Key Point | Explanation |
|---|---|
| 1. Maintain a Clean Workspace | A tidy, enclosed workspace reduces dust and ensures a smoother installation process. Bright lighting aids visibility for precision work. |
| 2. Use Quality Cleaning Materials | Employ professional-grade ammonia-free cleaners and lint-free cloths for optimal window preparation to enhance tint adhesion. |
| 3. Measure Precisely for Tint | Accurate measurements are essential for fitting the tint perfectly. Always verify dimensions before cutting to avoid mistakes during installation. |
| 4. Apply Tint Systematically | Utilise professional techniques when applying film, such as working from the centre outwards to avoid air bubbles and ensure smooth adherence. |
| 5. Conduct Thorough Quality Checks | Inspect the installation carefully for imperfections, ensuring adhesion and alignment, which contributes to the longevity and appearance of the tint. |
Step 1: Prepare the work area and materials
Preparing your workspace is crucial for achieving a professional large vehicle tint installation. This initial stage sets the foundation for a clean, efficient, and successful application process.
Start by selecting a clean, enclosed workspace with controlled temperature and minimal dust. Ideally, you want an area with good lighting, preferably natural light or bright overhead illumination that allows you to see details clearly. As outlined in the Australian Vehicle Window Tinting Training Standard, proper workspace preparation helps minimise material waste and ensures workplace safety.
Gather all necessary materials before beginning the installation. Your essential toolkit should include: high-quality tint film, sharp utility knife, precision cutting tool, squeegees, spray bottle with application solution, microfibre towels, heat gun, lint-free cloths, and protective gloves. Arrange these items systematically within arm’s reach to streamline your workflow and reduce unnecessary movement.
Thoroughly clean the vehicle’s windows using a professional-grade glass cleaner, removing all dirt, dust, and residue. Use lint-free cloths and work methodically, ensuring each window surface is completely spotless. Any remaining contaminants can compromise the tint’s adhesion and final appearance.
Professional Tip: Always keep a dedicated workspace cleaning kit separate from your vehicle preparation materials to maintain consistent hygiene standards and prevent cross-contamination.
Here is a summary of workspace and material preparation best practices for professional vehicle tinting:
| Preparation Aspect | Impact on Installation | Professional Recommendation |
|---|---|---|
| Workspace cleanliness | Reduces dust, improves finish | Use enclosed, well-lit area |
| Tools & material arrangement | Streamlines workflow, saves time | Systematically organise each tool |
| Window cleaning method | Boosts tint adhesion, prevents flaws | Use lint-free cloths and pro cleaner |
| Separation of cleaning kits | Prevents cross-contamination | Dedicated kits for each purpose |
Step 2: Clean and inspect all glass surfaces
Cleaning and inspecting vehicle glass surfaces is a critical step that directly impacts the quality and longevity of your window tint installation. This meticulous process ensures optimal adhesion and a flawless final result.
According to the Australian Vehicle Window Tinting Training Standard, surface preparation must follow manufacturer specifications using approved methods and materials. Begin by gathering specialised glass cleaning supplies: ammonia-free glass cleaner, lint-free microfibre cloths, razor blade scraper, and rubbing alcohol.
Carefully examine each window for existing damage, scratches, or imperfections before cleaning. Remove any stickers, residue, or previous tint remnants using a razor blade scraper at a 45-degree angle. Work slowly and gently to prevent glass surface damage. After mechanical cleaning, spray the glass with ammonia-free cleaner and wipe using horizontal then vertical strokes with a clean microfibre cloth to eliminate all dirt, dust, and oils.
Pay special attention to window edges, corners, and seal areas where debris often accumulates. Use rubbing alcohol as a final cleaning solution to remove any remaining contaminants and ensure a completely sterile surface. Always use fresh, clean cloths for each window to prevent cross-contamination.
Professional Tip: Wear lint-free gloves during the entire cleaning process to prevent transferring skin oils or dirt onto the pristine glass surfaces.
Step 3: Measure and pre-cut tint patterns accurately
Accurate measurement and precise pre-cutting are fundamental to achieving a professional window tint installation for large vehicles. These crucial steps determine the overall quality and appearance of your final product.
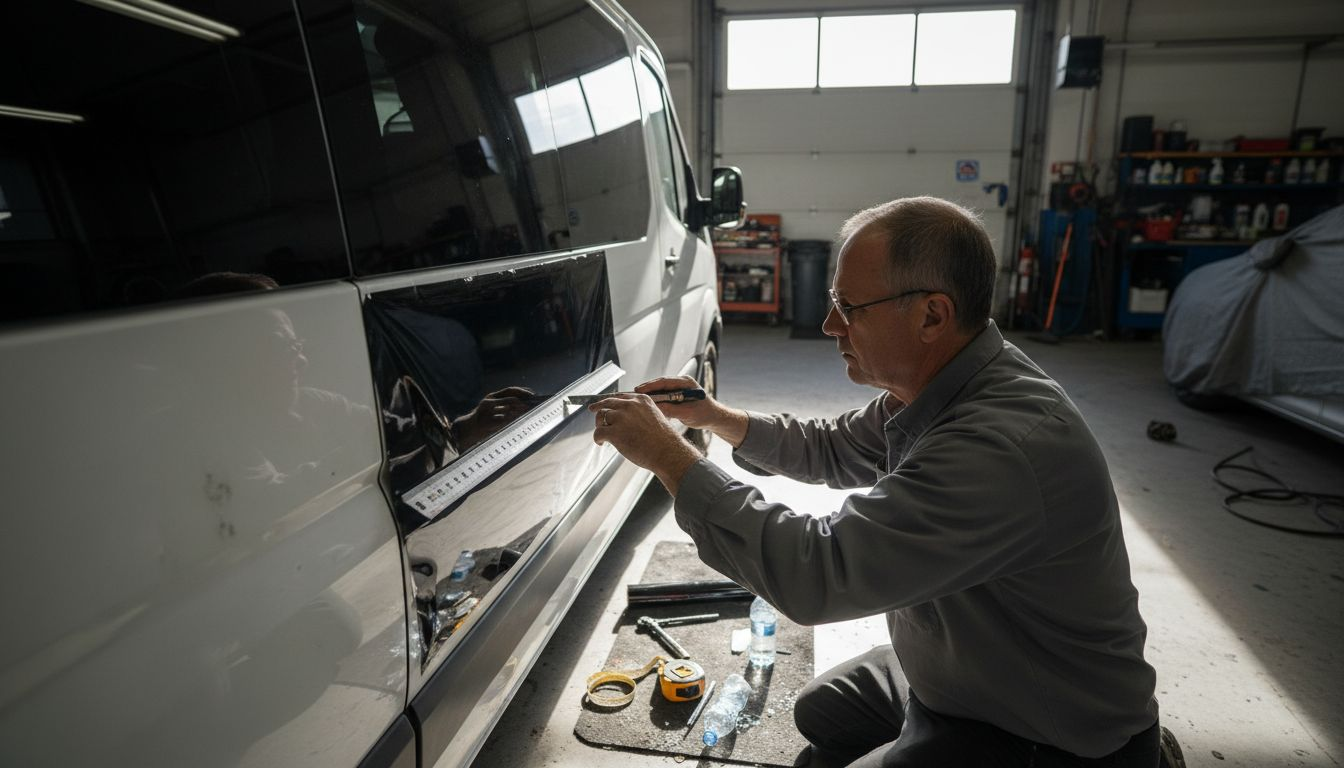
Following the Australian Vehicle Window Tinting Training Standard, your measurement process must adhere to strict workplace procedures that prevent potential damage to vehicle components. Begin by creating a clean, flat workspace with sufficient lighting and a large cutting mat. Use a professional measuring tape or digital measuring device to capture precise window dimensions, measuring both the height and width at multiple points to account for any slight variations.
When transferring measurements to your tint film, use a sharp utility knife and a straight edge to ensure clean, accurate cuts. Place the film on a cutting surface with a protective backing, and carefully trace your measurements, leaving a small margin of approximately 2 to 3 millimetres for adjustment during installation. This extra allowance provides flexibility when fitting the tint to curved or irregularly shaped windows, particularly on larger vehicles with complex glass surfaces.
Double check all measurements before cutting, as precision is paramount. Test fit the pre-cut film against the window to confirm accuracy, making minor adjustments as needed. Remember that each window may require slightly different cutting techniques depending on its shape and the vehicle’s specific design.
Professional Tip: Invest in a high-quality cutting mat with grid lines to enhance measurement accuracy and ensure straight, consistent cuts across all your tint film templates.
Step 4: Apply tint using professional techniques
Applying window tint requires precision, patience, and a systematic approach to achieve a flawless finish on large vehicle surfaces. Professional installation techniques can make the difference between an amateur and an expert result.
According to the Australian Vehicle Window Tinting Training Standard, window tinting material must be applied following strict manufacturer specifications and workplace procedures. Begin by thoroughly spraying the window with a professional installation solution, ensuring complete coverage. Position the pre-cut film carefully, using a squeegee to smooth out air bubbles and create a seamless application.
For complex window surfaces, such as rear windows with extensive curvature, professional installers often employ specialised techniques. Implement the two-piece installation method for expansive rear windows, carefully cutting the film into separate sections and installing each piece with a slight overlap. Use a heat gun to shrink the film precisely, ensuring it conforms perfectly to the glass contours and fits around defrosting strips and other window features.
Maintain consistent pressure with your squeegee, working from the centre outwards in smooth, overlapping strokes. Trim excess film carefully using a sharp blade, leaving a minimal margin around window edges. Pay extra attention to corners and edges, as these areas are most prone to lifting or imperfections. Allow sufficient time for the film to set and bond completely, avoiding any premature touching or disturbance of the newly applied tint.
Professional Tip: Invest in a high-quality infrared thermometer to monitor surface temperatures during heat shrinking, ensuring optimal film adhesion and preventing potential damage to the window or tint material.
Step 5: Verify installation quality and ensure durability
A thorough quality verification is the final crucial step in achieving a professional window tint installation that meets industry standards. This comprehensive inspection ensures your meticulous work translates into a flawless, long-lasting result.
Visual inspection guidelines recommend examining the tint from multiple perspectives to assess overall quality. Inspect the installation from inside and outside the vehicle, positioning yourself approximately 3 feet away in natural daylight. Look critically at the film’s edges, ensuring smooth transitions and complete adhesion around window contours. Check for common imperfections such as air bubbles, dirt particles, or subtle creases that might compromise the installation’s aesthetic and functional integrity.
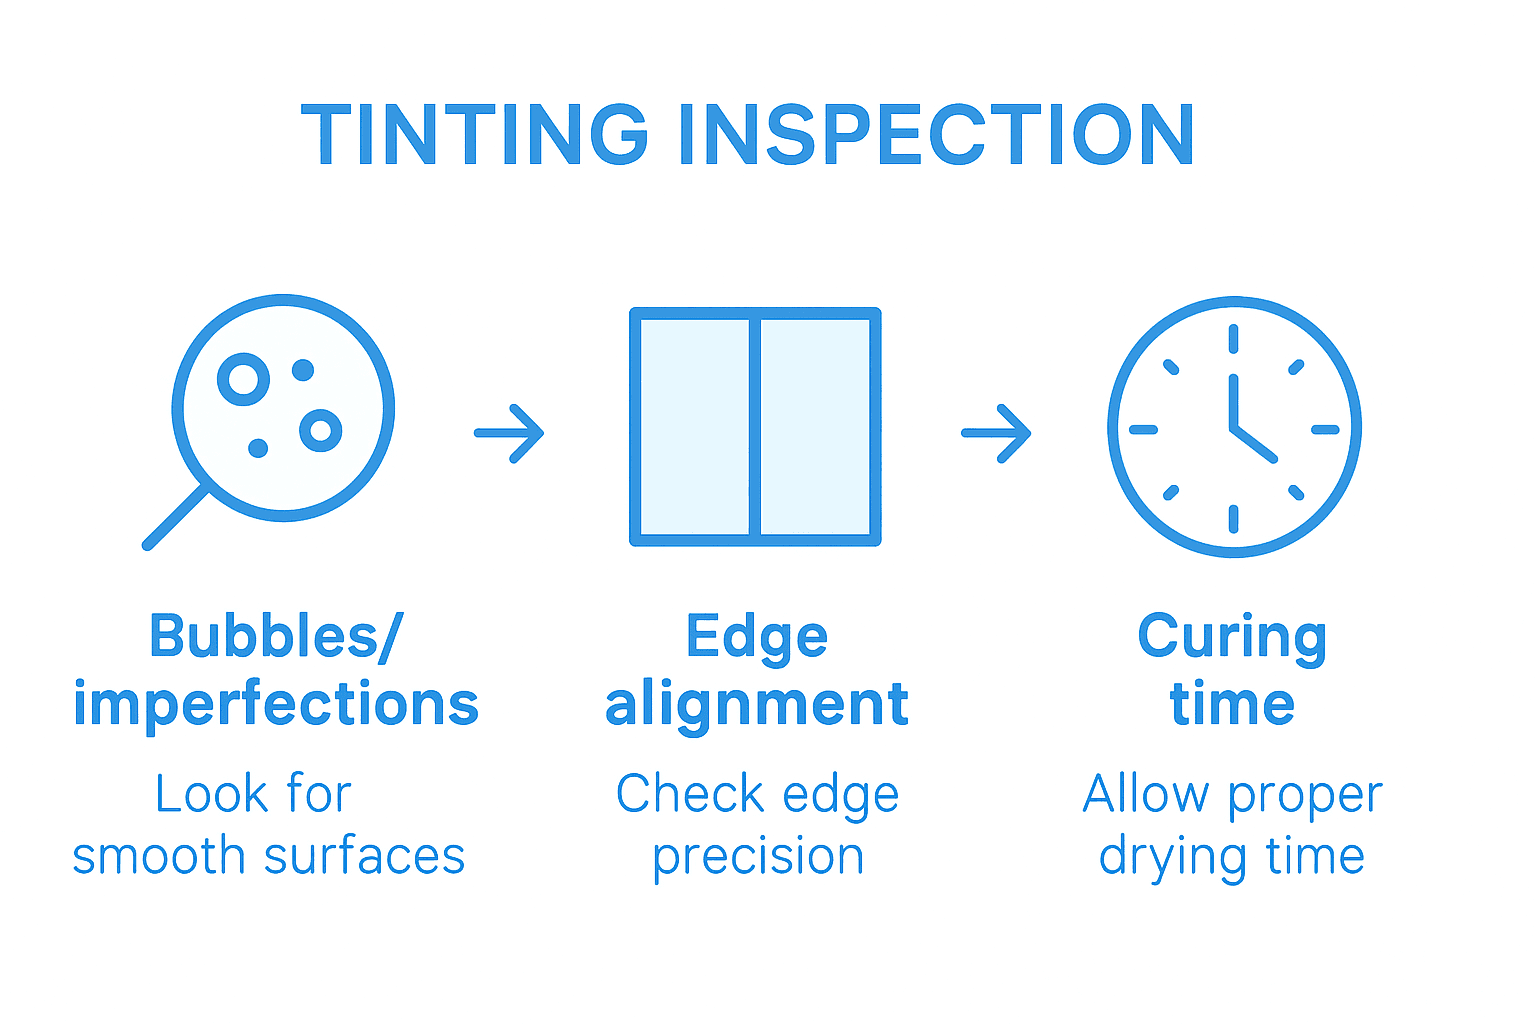
Focus on critical areas that typically reveal installation quality. Examine window corners, edges, and curved sections for any signs of lifting or uneven application. Run your fingers gently along the film’s surface to detect microscopic irregularities, paying special attention to defrosting strips and complex window geometries. Verify that the tint fits precisely within the window’s dimensions, with minimal margins and no visible gaps or misalignments.
Allow the installation to cure completely before subjecting the vehicle to extreme conditions. Avoid rolling down windows for at least 48 hours and keep the vehicle in a controlled environment to support optimal film adhesion. Consider providing your client with specific care instructions to maintain the tint’s appearance and performance over time.
The following table compares key quality checks during final tint inspection:
| Area Inspected | What to Look For | Professional Practice |
|---|---|---|
| Tint edges & corners | Smooth adhesion, no lifting | Inspect under natural daylight |
| Glass surface | Absence of bubbles and creases | Gentle touch to detect irregularities |
| Overall alignment | Even fit, no visible gaps | Assess from both inside and outside |
| Window features | Film conforms to curves & strips | Extra care around defrosting strips |
Professional Tip: Photograph the completed installation from multiple angles under different lighting conditions as documentation and to demonstrate your professional standards to potential clients.
Enhance Your Large Vehicle Tint Installation with Precision Cutting Software
Achieving flawless results in large vehicle tint installation demands meticulous preparation, exact measurements, and flawless application. The article highlights common challenges including accurate pre-cutting, minimising material waste, and ensuring a perfect fit on complex curved surfaces. If you aim to eliminate guesswork and enhance efficiency, embracing advanced cutting solutions is essential. Precise pre-cut patterns allow you to focus on installation quality rather than tedious manual cutting, reducing errors and saving time.
Discover how the window Tint – AEONCUT PPF Pre-cut Cutting software empowers professional installers and enthusiasts by delivering highly accurate, customisable tint templates.

Take control of your tinting projects today by visiting AEONCUT’s homepage to explore subscription plans that provide unlimited access to cutting-edge pattern libraries and AI-driven auto-nesting features. Streamline your workflow, reduce waste, and deliver impeccable results that impress your clients. Ready to transform your large vehicle tint installation process with precision tools tailored for success? Get started now and never compromise on quality again.
Frequently Asked Questions
How can I prepare my workspace for a large vehicle tint installation?
To prepare your workspace, select a clean, enclosed area with controlled temperature and adequate lighting. Ensure all necessary materials, such as high-quality tint film and cleaning supplies, are arranged within arm’s reach to streamline your workflow.
What cleaning supplies should I use for preparing the glass surfaces before tinting?
Use ammonia-free glass cleaner, lint-free microfibre cloths, and a razor blade scraper for removing any old tint or residues. Make sure to clean each window thoroughly to ensure optimal adhesion of the tint film.
How do I measure and pre-cut the tint film accurately?
To measure and pre-cut the tint film, use a professional measuring tape to capture precise dimensions of each window. Always leave a small margin of approximately 2 to 3 millimetres for adjustments during installation, and double-check your measurements before cutting the film.
What techniques should I use for applying tint to large vehicle windows?
Apply the tint film by spraying the window with a professional installation solution and positioning the pre-cut film carefully. Use a squeegee to smooth out air bubbles and, for complex windows, consider employing a two-piece installation method to ensure a seamless application.
How can I verify the quality of my tint installation after completing the job?
To verify the installation quality, conduct a visual inspection to check for smooth edges, bubbles, and proper alignment. Assess each window from multiple angles and allow the tint to cure fully by avoiding window movement for at least 48 hours after application.
What are some common mistakes to avoid during large vehicle tint installation?
Avoid neglecting workspace cleanliness, as contaminants can affect adhesion. Additionally, ensure accurate measurements and avoid rushing the installation process to prevent bubbles and misalignments that detract from your results.
Recommended
- How Window Tint Works: Essential Guide for Auto Professionals 2025 – AEONCUT PPF Pre-cut Cutting software
- How to Read Tint Percentage: A Practical Guide for 2025 – AEONCUT PPF Pre-cut Cutting software
- How to Read Tint Percentage: A Practical Guide for 2025 – AEONCUT PPF Pre-cut Cutting software
- How to Read Tint Percentage: A Practical Guide for 2025 – AEONCUT PPF Pre-cut Cutting software
- Top Workshop Organization Tips for Diesel Injection Technicians 2025 – My WordPress


