
Professional installers often underestimate how small technique variations dramatically affect sun blocking window tint performance. Many believe that film quality alone determines UV and heat rejection, yet installation precision, surface preparation, and cutting accuracy contribute equally to blocking effectiveness. This article reveals advanced optimisation methods that separate amateur installations from professional results, covering cutting-edge software tools, installation techniques that maximise thermal rejection, and maintenance protocols that extend tint lifespan. You’ll discover how modern pattern software reduces waste whilst improving precision, why heat shrinking matters for complex curves, and which quality checks ensure consistent sun protection across every installation.
Table of Contents
- Understanding Sun Blocking Window Tint Technology
- Advanced Cutting And Pattern Tools For Precise Installation
- Optimal Installation Techniques For Maximum Sun Blocking Performance
- Maintenance And Quality Assurance For Lasting Results
- Upgrade Your Tint Installations With Aeoncut Software
- FAQ
Key takeaways
| Point | Details |
|---|---|
| Advanced techniques boost performance | Professional methods improve heat and UV blocking by up to 30% compared to standard installations. |
| Cutting software saves materials | Pattern software reduces film waste by 40% whilst accelerating installation speed. |
| Proper maintenance extends lifespan | Following correct cleaning and care protocols doubles the effective life of sun blocking tint. |
| Film type matters significantly | Ceramic tints outperform dyed films in UV rejection and thermal comfort. |
Understanding sun blocking window tint technology
Sun blocking window tint technology has evolved dramatically beyond simple dyed films. Modern tints employ sophisticated materials engineered to reject specific wavelengths of solar energy whilst maintaining optical clarity. Understanding these technologies helps you recommend the right solutions and install them properly.
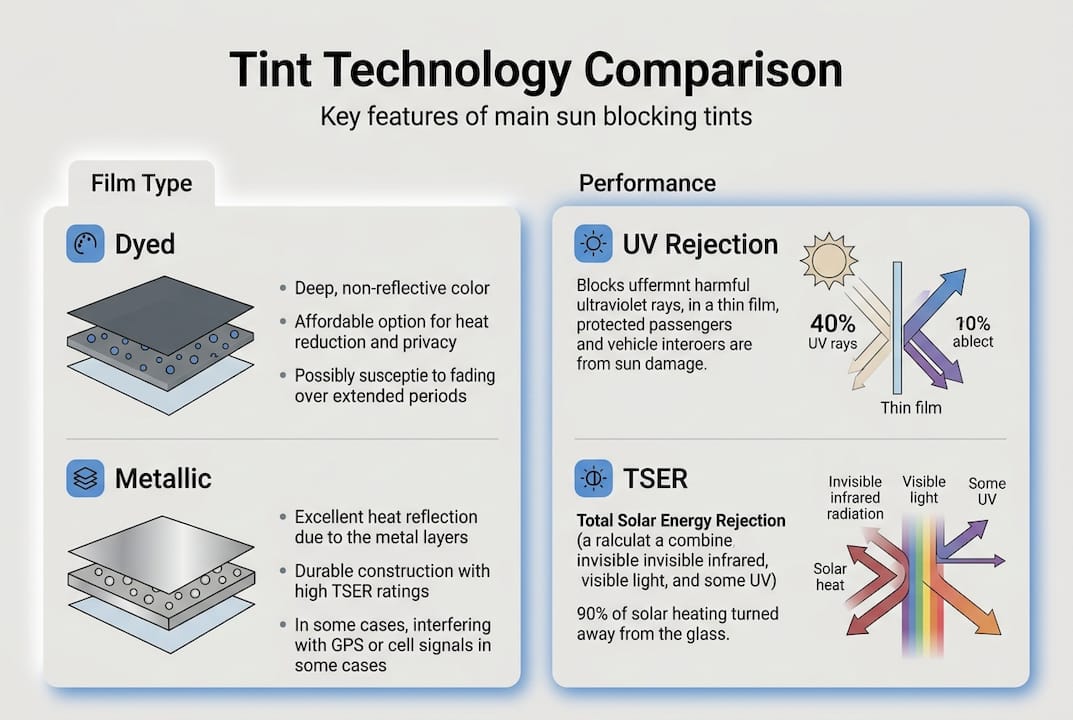
Three primary tint technologies dominate the professional market. Dyed films absorb solar energy through pigments, offering basic heat reduction and privacy at lower price points. Metallic films incorporate reflective particles that bounce infrared radiation away from vehicle interiors, providing moderate heat rejection with some signal interference concerns. Ceramic films use non-conductive, non-metallic particles to block infrared and UV radiation without affecting electronic signals, representing the premium tier for sun blocking performance.
The physics of sun blocking centres on rejecting infrared radiation, which carries approximately 53% of solar heat energy. Advanced window tints can block up to 99.9% of UV rays whilst rejecting 50% to 80% of total solar energy depending on film specification. This dual action protects vehicle interiors from fading and occupants from excessive heat exposure. Visible light transmission percentages determine darkness levels, typically ranging from 5% (very dark) to 70% (light tint), with legal limits varying by jurisdiction.
Installation technique profoundly impacts these blocking properties. Poor adhesion creates microscopic air pockets that scatter light and reduce optical clarity. Contaminated surfaces prevent proper bonding, leading to premature failure. Incorrect heat application during shrinking can alter film properties or create distortion. Every installation variable affects the final blocking performance, making technique as crucial as film selection.
Pro Tip: Always verify manufacturer specifications for infrared rejection percentages, not just visible light transmission, when selecting best window tint type for sun blocking applications.
Key performance metrics for professional evaluation include:
- Total Solar Energy Rejected (TSER): Measures overall heat blocking effectiveness
- UV Rejection: Percentage of ultraviolet radiation blocked, critical for interior protection
- Visible Light Transmission (VLT): Determines darkness and legal compliance
- Infrared Rejection: Specific blocking of heat-carrying wavelengths
- Glare Reduction: Impact on visual comfort during bright conditions
| Film Type | UV Rejection | IR Rejection | TSER | Signal Impact |
|---|---|---|---|---|
| Dyed | 95-99% | 25-35% | 30-40% | None |
| Metallic | 99% | 40-60% | 45-65% | Moderate |
| Ceramic | 99.9% | 60-95% | 55-80% | None |
| Hybrid | 99% | 45-70% | 50-70% | Minimal |
Environmental factors during installation also matter. Ambient temperature affects adhesive activation and film pliability. Humidity levels influence drying time and bubble formation risk. Direct sunlight exposure during installation can cause premature adhesive curing before proper positioning. Professional installers control these variables to optimise blocking performance consistently.
Advanced cutting and pattern tools for precise installation
Precision cutting transforms sun blocking tint installation from time-consuming manual work into efficient, repeatable processes. Modern pattern software and cutting tools eliminate guesswork whilst reducing material waste, directly impacting profitability and installation quality.
Pattern libraries contain thousands of vehicle-specific templates, accounting for window curves, trim locations, and edge requirements. These digital patterns ensure consistent cuts across installations, eliminating the trial and error that wastes expensive ceramic films. Cloud-based updates add new vehicle models continuously, keeping your pattern library current without manual downloads or version management.
Cutting software can reduce film waste by up to 40% compared to manual cutting methods. This reduction stems from optimised material layout, precise edge allowances, and elimination of measurement errors. For shops installing 20 vehicles weekly, this waste reduction translates to thousands in annual material savings whilst improving installation speed.
Software-assisted cutting delivers multiple advantages over traditional hand-cutting approaches:
- Consistent edge quality eliminates hand-trimming time
- Complex curves match perfectly to window contours
- Pattern modifications adjust for customer preferences instantly
- Material nesting maximises film roll utilisation
- Digital archives preserve custom patterns for repeat customers
Integrating master window tint software into daily workflow requires initial investment but pays dividends immediately. Start by digitising your most common vehicle models, then expand the library as new makes arrive. Train technicians on pattern selection and minor adjustments before progressing to custom modifications. Most shops achieve full software integration within two weeks, with productivity gains appearing in the first week.
Pro Tip: Create custom pattern sets for fleet vehicles you service regularly, saving 15-20 minutes per installation on repeat orders.
| Cutting Method | Average Cut Time | Waste Percentage | Edge Quality | Repeatability |
|---|---|---|---|---|
| Manual hand cutting | 25-35 min | 15-25% | Variable | Low |
| Template tracing | 15-20 min | 10-15% | Good | Moderate |
| Software with plotter | 5-8 min | 3-6% | Excellent | High |
| Fully automated | 3-5 min | 2-4% | Excellent | Very High |
Modern plotters interface directly with pattern software, translating digital designs into physical cuts with micrometre precision. Blade depth settings adjust for different film thicknesses, ensuring clean cuts without backing liner damage. Some systems incorporate optical alignment, automatically positioning patterns to account for film roll variations.
Comparing window tint pattern tools comparison reveals significant capability differences. Entry-level systems offer basic pattern libraries with manual adjustments. Mid-tier solutions add cloud updates and custom pattern creation. Professional platforms integrate inventory management, customer databases, and automated nesting algorithms that maximise every centimetre of film roll.
The return on investment for professional cutting systems typically occurs within six months for busy shops. Calculate your current material waste, multiply by film costs, then add labour time savings from faster cutting. Most installers discover that precision cutting tools pay for themselves through waste reduction alone, with speed improvements providing additional profit margin.
Optimal installation techniques for maximum sun blocking performance
Installation technique determines whether premium sun blocking film delivers its full potential or underperforms due to application errors. Mastering these advanced methods ensures consistent results that satisfy customers and build your reputation.
Surface preparation begins installation success. Clean windows thoroughly with professional-grade solutions that remove oils, residues, and contaminants without leaving streaks. Use lint-free microfibre cloths to avoid introducing fibres that create bubbles. Inspect carefully for existing damage, as cracks or chips will telegraph through tint and potentially expand during installation. Razor blade the edges and gaskets to remove accumulated debris that prevents proper edge adhesion.
Follow this proven installation sequence for optimal blocking performance:
- Measure and verify window dimensions against pattern specifications
- Cut film with 2-3mm edge allowance for trimming flexibility
- Apply slip solution generously to both window and film adhesive
- Position film carefully, aligning edges before initial squeegee contact
- Perform centre-out squeegee strokes to eliminate solution and air
- Heat shrink complex curves using controlled temperature application
- Trim edges precisely with sharp blades at consistent angles
- Final squeegee pass with firm pressure ensures complete adhesion
- Edge seal inspection confirms no lifting or gap formation
- Clean exterior surface and inspect for any imperfections
Heat shrinking enhances tint conformity on complex window surfaces, particularly rear windows with compound curves. Apply heat gradually using sweeping motions, never concentrating on one spot. The film should conform smoothly without distortion or colour change. Overheating damages blocking properties and creates permanent wrinkles, whilst insufficient heat leaves fingers and bubbles that compromise appearance and performance.
Edge sealing deserves special attention for sun blocking applications. Properly sealed edges prevent moisture intrusion that causes adhesive failure and peeling. Use firm squeegee pressure within 3mm of edges, then verify complete contact. Some installers apply additional edge sealant for marine or high-humidity environments, though quality installation typically eliminates this need.
Pro Tip: For large vehicle tint installation guide projects, work with a partner to maintain slip solution coverage on oversized windows whilst positioning film.
Common pitfalls that reduce sun blocking effectiveness include:
- Insufficient cleaning leaves contaminants that prevent adhesion
- Excessive solution application extends drying time and risks water spots
- Aggressive squeegee pressure during initial positioning creates scratches
- Inadequate heat shrinking leaves stress points that eventually fail
- Rushed edge trimming produces gaps where UV penetrates
- Working in direct sunlight causes premature adhesive activation
Curing time varies by film type, temperature, and humidity. Ceramic films typically require 3-5 days for complete adhesive cure, during which slight haziness may appear. Educate customers about this normal curing process to prevent premature complaints. Avoid window operation during initial cure periods to prevent edge lifting or film displacement.
Quality control checks immediately post-installation catch issues before customer delivery. Inspect edges from multiple angles for gaps or lifting. View windows from inside and outside to identify any bubbles, contamination, or distortion. Verify that blocking performance meets specifications using a heat lamp test if equipment available. Document installation with photos for warranty purposes and quality tracking.
Advanced installers develop sensitivity to film behaviour during application. You’ll feel when adhesive begins grabbing, when heat reaches optimal shrinking temperature, and when squeegee pressure achieves proper solution evacuation. This tactile expertise comes through repetition and attention to feedback from each installation, separating competent technicians from master craftspeople.
Maintenance and quality assurance for lasting results
Sun blocking window tint requires proper maintenance to deliver lasting performance. Educating customers on care protocols prevents premature failure whilst establishing your expertise and building long-term relationships.
Client guidance begins immediately after installation. Explain the curing process and window operation restrictions clearly. Provide written care instructions that customers can reference later. Emphasise that proper maintenance can significantly extend window tint lifespan and effectiveness, typically doubling the years of optimal sun blocking performance compared to neglected installations.
Cleaning protocols protect film surfaces from scratches and degradation. Recommend ammonia-free cleaning solutions specifically formulated for window tint, as ammonia damages adhesives and causes discolouration. Soft microfibre cloths prevent scratching, whilst paper towels and abrasive materials should be avoided completely. Vertical wiping motions reduce edge lifting risk compared to circular patterns that can catch film edges.
Pro Tip: Create branded care instruction cards with your contact information, turning every installation into a marketing opportunity whilst ensuring customers maintain their tint properly.
Post-installation quality checks you should perform include:
- Edge adhesion verification at all window perimeters
- Bubble inspection under varied lighting conditions
- Distortion assessment from multiple viewing angles
- Blocking performance confirmation using heat rejection meters
- Customer education on care requirements and warranty terms
Environmental factors significantly impact tint longevity. Extreme heat accelerates adhesive degradation, particularly in dashboard areas receiving concentrated sun exposure. Coastal environments introduce salt air that can penetrate edge seals if installation quality was marginal. Cold climates create contraction stress that reveals poor adhesion. Understanding these regional challenges helps you adjust installation techniques and set realistic customer expectations.
“The difference between tint that lasts three years and tint that lasts ten years often comes down to installation quality and customer care habits. Proper edge sealing and surface preparation during installation, combined with gentle cleaning practices, determine long-term blocking performance.” – Industry installation specialist
Warranty claims provide valuable quality feedback. Track failure patterns to identify technique improvements or material issues. Common failure modes include edge lifting from inadequate sealing, bubbling from contaminated surfaces, and discolouration from chemical exposure. Each failure teaches lessons that improve future installations and reduce warranty costs.
Seasonal maintenance recommendations help customers protect their investment. Summer heat intensifies UV exposure, making shade parking beneficial when possible. Winter conditions may cause temporary haziness that resolves as temperatures moderate. Spring pollen and summer insects require more frequent cleaning, using proper techniques to avoid surface damage.
For professional installers, maintaining your own skills ensures consistent quality. Review essential window tint maintenance best practices regularly, stay current on new film technologies, and practise advanced techniques on scrap materials. Consider diy tint installation tips resources to understand common customer questions and DIY mistakes that create opportunities for professional correction services.
Quality assurance extends beyond individual installations to systematic process improvement. Document your techniques, track installation times and material usage, and analyse customer feedback for improvement opportunities. Shops that treat installation as a continuously improving process consistently outperform competitors who rely on static methods learned years ago.
Upgrade your tint installations with AEONCUT software
Professional sun blocking tint installation demands precision tools that match your expertise. AEONCUT software delivers the cutting accuracy and efficiency that separate profitable shops from struggling competitors, reducing material waste whilst accelerating installation speed.
Our pattern library contains thousands of vehicle-specific templates optimised for sun blocking applications, with cloud updates adding new models continuously. The best PPF precut cutting software principles apply equally to window tint, ensuring every cut matches complex curves perfectly. AI-driven nesting algorithms maximise your film roll utilisation, directly impacting material costs and profitability.

Discover how precut software reduces film waste by up to 40% whilst improving installation consistency across your team. AEONCUT integrates seamlessly into existing workflows, with intuitive interfaces that reduce training time. Professional and enterprise subscription plans scale with your business, offering unlimited pattern access and comprehensive support. Explore master window tint software capabilities that transform your installation efficiency and customer satisfaction today.
FAQ
What types of window tint offer the best sun blocking?
Ceramic tints generally provide superior UV and heat rejection compared to dyed or metallic films, blocking up to 95% of infrared radiation whilst maintaining signal transparency. Hybrid films offer a balance of cost and performance for customers seeking quality sun blocking without premium pricing. Consider best window tint type recommendations based on customer budget and blocking requirements.
How does professional software improve tint installation?
Software ensures precise pattern cuts, minimising waste and installation errors that compromise sun blocking effectiveness. It accelerates workflow significantly, allowing more installations daily without sacrificing quality or customer satisfaction. Master window tint software platforms integrate pattern libraries, cutting control, and inventory management for comprehensive shop efficiency.
What maintenance tips ensure longevity of sun blocking tint?
Use gentle, non-abrasive cleaning materials and ammonia-free solutions specifically formulated for window films. Avoid sharp objects and excessive heat exposure post-installation, allowing proper cure time before window operation. Follow essential window tint maintenance protocols to double effective tint lifespan whilst preserving blocking performance.
How long does sun blocking window tint take to cure fully?
Ceramic and premium films typically require 3-5 days for complete adhesive cure, depending on ambient temperature and humidity levels. During this period, slight haziness is normal and will clear as moisture evaporates. Customers should avoid window operation and aggressive cleaning until curing completes to prevent edge lifting or film displacement.
Can installation technique really affect sun blocking performance?
Absolutely. Poor surface preparation creates adhesion issues that allow air pockets, reducing optical clarity and blocking effectiveness by up to 20%. Inadequate heat shrinking leaves stress points that eventually fail, whilst improper edge sealing permits UV penetration around perimeters. Professional technique maximises the blocking properties engineered into premium films.
Recommended
- What Type of Window Tint Is Best for Professional Installers – AEONCUT PPF Pre-cut Cutting software
- UV Window Tint: Precision Solutions for Installers – AEONCUT PPF Pre-cut Cutting software
- Heat Shrinking Window Tint: 2025 Guide for Installers – AEONCUT PPF Pre-cut Cutting software
- Mastering maximum legal window tint limits for 2026 – AEONCUT PPF Pre-cut Cutting software


